Friday, May 30, 2014

Tangle-Free Ribbon Wands

Are you looking to purchase some ribbon wands or do your ribbon wands keep getting tangled? You need to read this!
Eight years ago, I completed my first level of Orff Schulwerk training and devoted a big portion of my classroom budget for creative movement props. One of my biggest regrets, until now, was purchasing a class set of ribbon sticks from Oriental Trading. A very similar product is still found on orientaltrading.com.  They come in sets of 6 and are currently $8.


I had immediate buyer's remorse when I discovered how easily they would tangle. These ribbon sticks do not allow for the ribbon to swivel 360 degrees and therefore the ribbon tangles very easily. Also, once the ribbon is tangled, kids start yanking on it and cause the rubber end cap to come off. For years, they have been stored in the cabinets without being used.


This year, I pulled them out of the closet again after finding the "Chinese Ribbon Dance" lesson in Artie Almedia's Mallet Madness. I was determined to find a solution and put these props to use. 
 I searched online and found the Tikkido blog which suggested using swivels that are used for fishing lures. I had actually purchased a small package of swivels and had planned on investing in some new dowel rods. Since I had not purchased the dowels, I had not repaired them yet.
But, this week, two third graders showed ingenuity and solved my problem without the purchase of extra hardware!


My ribbons were connected to the stick with an eye hook and a metal clip. They discovered that if you remove the eye hook and rubber end cap, you can slide the biggest side of the metal clip around the stick. Then, simply replace the black end cap. The end caps may need a drop or two of glue to ensure they won't come off. My students are begging to come back to glue the end caps on another day! I was going to try super glue or a hot glue gun. But, if I let students repair it, I may use a safer adhesive.  Yes, the metal clip will slide up and down the stick. But, when you are using the ribbon your arm is continuously moving, so it does not slide around until you stop.

When these two showed me their discovery, I was elated!!! They repaired all 30 of my ribbon wands for FREE! (Although, I do plan on buying them some M&M's) 

 I have one last picture to show you how I store my ribbon wands. This is similar to my Boomwhacker storage, if you have seen that post. I separate each color in a smaller box which fit inside a bigger box.


The skinny boxes were actually very long boxes I kept when I purchased some wooden decorative shelves for my home. I had 3 boxes and simply cut them in half down the middle. I'm sure you can find similar sized boxes if you look or ask around. I am very conscious of our planet and try to reuse or repurpose things whenever possible!


I am so excited about the ribbon wands. This summer I plan on going through my Orff Level binders and searching the web for ideas to use them in lessons. If you have any suggestions, please comment below. I will leave you with one last picture of my problem-solving duo, Hunter and Leah, demonstrating the tangle-free ribbon wands!!!


It's a Linky Party!


July 25, 2015

Saturday, May 17, 2014

National Boards Update


I have submitted my portfolio retakes! I have one more computer assessment in a couple weeks, and then will begin the long wait for scores ... 
In the mean time, you can look forward to seeing more frequent posts!

Saturday, March 22, 2014

Minions Invade the Music Room!!!


My student teacher and I recently designed two lessons inspired by the Despicable Me movies. Both flipcharts are available for free download on Promethean Planet.

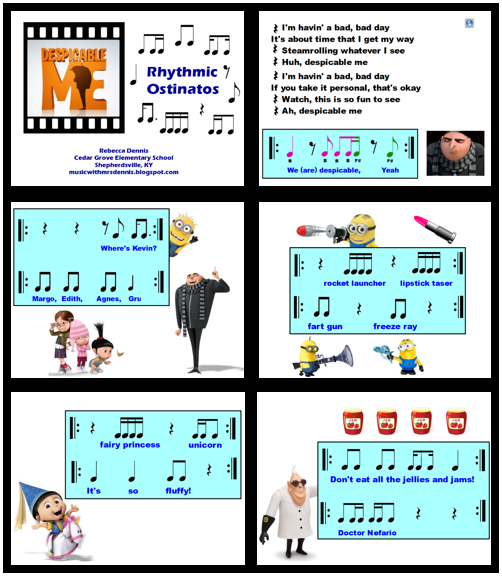
The first lesson focused on rhythmic ostinatos and complementary rhythms. It also finished a unit which had introduced sixteenth notes to fifth graders. We had a few students playing an ostinato on Bass Boomwhackers to accompany the chorus of "Despicable Me" (the title theme for the first movie). The rest of the class was assigned rhythmic ostinatos performed in pairs as complementary rhythms. You could add instrument sound effects for the rhythms, but we added body percussion. Unfortunately, I did not think to take a video of this lesson. But, the flipchart is now uploaded to Promethean Planet and is available for free download! The slides of the flipchart can be seen in the collage below.


The next lesson reviewed harmony and introduced chord building. Students learned how to build chords by alternating letters and stacking alternating pitches on the staff. We used Boomwhackers to play chords along with Pharrell's "Happy" from Despicable Me 2 (Oscar Nominee 2014!) The students also learned about call and response and chorus/verse structure. The flipchart is available for free download on Promethean Planet. Images from the flipchart can be seen in the collage below.


I also have a video of a class performing Boomwhackers for this lesson. It is far from perfect and my dancing is pretty embarrassing, but I will share it anyway! Please, don't judge! lol


I hope your students enjoy these lessons as much as mine did!

Friday, February 7, 2014

Don Gato


I love being a student teacher mentor because it keeps my curriculum fresh. As my student teachers explore books and materials from my shelf, they discover songs and poems that I have overlooked for years! Last fall, I had my first student teacher for just 8 weeks. Ms. Morrison discovered the Mexican song "Don Gato" in an old textbook. (Grade 3, Music Connection from Silver Burdett & Ginn)  The book suggested students play the chord roots on Orff instruments along with the recording. However, the chord progression was very challenging for many of the students in the short amount of time provided in the lesson. Also, the instruments were so loud it was very difficult for the students to hear the recording and stay with the tempo of the song. Although the lesson didn't go as well as planned, it was a great teachable moment and allowed for Ms. Morrison to practice self-reflection.

This fall, I had the pleasure of mentoring a second student teacher for an entire semester! Ms. Moreman and I cotaught "Don Gato" with some modifications. The original goal of the lesson was to teach about a ballad. The students would still learn about a ballad, but we decided the main focus of the lesson would be chord building. We had just studied the order of the musical alphabet with some relay races and small group games. (Click here to learn more about the staff games!) We wanted to reinforce this concept because some students were still struggling to remember that A follows G. We also decided to use Boomwhackers instead of barred instruments. The Boomwhackers were much more quiet and did not overpower the recording. The students LOVED  this lesson!

Lesson Sequence 

  1. Discuss the term "ballad". Play one verse of "Don Gato" at a time, asking students what is happening in the story and how the plot has changed. I display the words of each verse on the flip chart as we discuss it.
  2. Display the slide with "tempo" and "dynamics" definitions. Ask the students when they hear these musical elements change and how that was related to the story. (The music gets quieter and slower when Don Gato dies and louder and faster when he comes back to life.)
  3. Review the definition of "harmony." Using a xylophone, demonstrate how to build a chord by skipping every other letter. Give the students a starting letter and ask them to spell the chord and build a triad (diatonic). Play each triad on the xylophone and ask them if it sounded major or minor.
  4. Divide the class into 4 groups, one for each chord in the song (D minor, C major, G minor, and A major). Each student will play one or two Boomwhackers from their chord.  Ask  to play with a steady beat and then ask them only to play when you point to their chord grouping on the board.
  5. Display the harmonic progression to accompany the song.  Practice the progression in tempo without the music and then try to accompany the recording, remembering to change tempo and dynamics on the appropriate verse. 
  6. We also tried to sing the song without the recording so we could hear the Boomwhackers more clearly. I was able to conduct the groups and Ms. Moreman changed the slides to display the lyrics. (this could easily be a job for a student helper) The students' favorite part, by far, was singing "meow, meow, meow" in each verse.

Music Recording

I used the textbook CD to accompany the Grade 3 Music Connection by Silver Burdett & Ginn. If you don't have that textbook series, you can use the audio from this YouTube video.


How Many Boomwhackers Do You Need?


When I taught this lesson  I used 5 sets of diatonic Boomwhackers and 6 Octavator caps. The small black rectangles represent the octavator caps which lower the pitch of the Boomwhacker a full octave. When teaching the lesson, I challenged the students to guess what the small black rectangles would represent. There was at least one student in each class who remembered the Octavator Caps from a previous lesson.


If you only have diatonic Boomwhackers, the A major and G minor chords will feature only the root and the fifth of the chord. 

If you have 24 kids in a class, each group would have about 6 kids. So, you would need:
  • Group 1: DFA, 2 of each pitch
  • Group 2: CEG, 2 of each pitch
  • Group 3: GD, 3 of each pitch, 3 Octavator caps on G 
  • Group 4: AE, 3 of each pitch, 3 Octavator caps on A
I have since purchased 2 sets of chromatic Boomwhackers. So, next year I plan on using this set up:
  • Group 1: DFA, 2 of each pitch
  • Group 2: CEG, 2 of each pitch
  • Group 3: GBbD, 2 of each pitch with 4 Octavator caps on G and Bb
  • Group 4: AC#E, 2 of each pitch, with 2 Octavator caps on A
 For this set up, you would only need 4 diatonic sets, 2 chromatic sets, and 6 Octavator Caps.

I also purchased a set of bass diatonic Boomwhackers and plan rewarding one student in each group with the big Bass Boomwhackers. These sound best when you place an Octavator cap on them, hold them vertical, and tap the cap end on the carpeted floor.

 ***In the uploaded flipchart, both versions are available (with and without Bb and C#). You can choose which version to use according to your available resources.


Tuesday, February 4, 2014

Free App Alert! Rhythm Cat Pro


I posted about the Rhythm Cat app in 2012. To read that post and learn more about the app, click here. I had downloaded the Lite version which was free. To unlock more levels, you had to purchase the Pro version for $4.99. Thanks to AppShopper, I have just been notified that Rhythm Cat Pro is currently marked down and is FREE to download! ENJOY!


Click here to learn more about AppShopper so you can make your own wish list and be notified of future price drops!

Wednesday, January 29, 2014

AppShopper Wishlist


A couple weeks ago, I blogged about two free apps to get young students composing--Tune Train and  Music4Kids. Unfortunately, the Music4Kids app was only temporarily free and is now $2.99. I'm sorry if you missed out on the sale. To insure that you won't miss out on any future sales, may I recommend AppShopper?


AppShopper is free and available as an app on your device or online from their website. You can create a wish list of apps that you would like to purchase in the future. You will receive a notification if the price changes on the app. If you don't think you will log into the site or don't want to install the app on your device, you can also request to receive email notifications when any of your wish list apps go on sale.


Make sure you check out the App Activity to see the price history as well as update history. You can see how often it goes on sale and predict when it might go on sale again. Below you can see that the Dr. Seuss Band was on sale from February-April 2012.  If it ever goes on sale again, it would likely be part of the Seuss birthday celebrations around March 2nd.


I have started my wish list of music apps that are not free in hopes that I can catch a sale in the future! Below you can see screenshots of my wish list. Are there any awesome apps I should add to my wishlist?


Dr. Seuss Band is only 99 cents. This is a great price for an app, but I haven't attempted spending school money on apps yet. The process described by our tech department sounded very complicated and I've avoided it, so far, by downloading free apps.

If you missed my post of 110 Free Music Apps, follow this link!

Saturday, January 18, 2014

Free Apps For Young Composers


I have found two more free apps that allow young students to explore music composition.

Tune Train

The first app is called Tune Train. There are 10 musical worlds available to explore.  Each world features a different musical style.

 iPad Screenshot 5
On each beat, you see people high and low. They essentially outline a chord. You use the train to draw a path and select people/notes you want in your melody. If you want to omit a note on that beat, you can make the train bypass that stop completely. This gives you options to alter the rhythm as well. Each student could create a truly unique song even if they selected the same musical world.

iPad Screenshot 2

You can also view the actual music notation at the top of the screen.

iPad Screenshot 4

Here is a video demonstrating the app:


___________________________________________________
Music4Kids
The second app I have found is called Music4Kids. In this app, you see an actual treble clef staff. When you place a note on the staff, the pitch name also appears above it. Each note defaults as an eighth note. To make longer durations like quarter and half notes, you must hold your finger on the screen for a longer time.
iPhone Screenshot 1
There are 5 different musical planets available: birdy, hamster, octopus, fox, and ghost.
iPhone Screenshot 4
There is an option to save your composition to your "My Tunes" library. This may be a helpful tool for teachers. If students create a song during class, the teacher can go back through later to view what their work.

There is also a part of the game called "Challenges." This is a simple introduction to melodic dictation. Initially, the app will show you the music notes and play the melody. Then, you must notate the melody. If you need help, you may listen to the tune again, but it will not show the notation a second time.
Here is a short video demonstrating the app:


___________________________________________________

Both apps are very kid-friendly and easy to navigate. The fact that they are free is also a wonderful bonus! I look forward to using these in the classroom.