Showing posts with label melody. Show all posts

Sunday, January 24, 2021

Scratch Melodic Games


The challenges of distance learning have led me down a deep rabbit hole to learn how to code. I have been using Scratch to create interactive music experiences for my students learning at home. If you missed my other posts on Scratch, click this link.

The projects I'm sharing in this post focus on melody. In Tideo, the students will play the Tideo phrase at the ends of each line. In the video lessons, we examined the staff notation and used hand signs to sing in solfege. In a normal lesson, we would transfer this melody to the Orff instruments. In the Scratch, the song will play and a yellow box will appear around the notation for each phrase. Students use their number keys to play the melody.


I would normally use "Home" by Phillip Phillips with recorders. We would play the chorus on recorders and play the refrain on the xylophones. On Scratch, students will use their number keys to play both on a virtual xylophone. A yellow box will appear around each melody to show the students when to play.


"The Ballad of the Beetles and the Bedbugs" allows students to play a melodic ostinato to accompany the song-a broken bordun. Then, they have a chance to improvise a melodic section. This is one of the first lessons introducing melodic improvisation. I love using the baseball analogy. I compare Do to homebase and ask the students to end their melody on Do.


I hope your students enjoy these games! 


Click for more Scratch games created by me.

Click to join the Facebook Group Scratch for Music Educators.

Wednesday, October 21, 2020

Music Educators Coding With Scratch

Coding. Did I ever think I would be teaching myself how to code? Nope. But, here I am jumping down the rabbit hole. Who knew it would be something that would expand my skills as a music educator?

I elected to be a cloud teacher for the district through December. I am the sole elementary music educator for 1400 cloud students. So, all of my teaching must be delivered asynchronously. With this large amount of students, creating instrument kits was out of the question. So, I started searching the web for interactive music instruments to include in my virtual classroom. That is when I discovered Scratch.

Scratch is a website where anyone can program interactive games, stories, and animations. This is completely free and you do not have to log on to access the games. I first found interactive instruments that were created by others.  I featured them in my Virtual Classroom. You may click the image below to visit and take a peek.


I started including these instruments in lessons. I provided a link for the students to go to the virtual xylophone and try to play a song using their number keys. That seemed to be successful, but I wanted the students to be able to see the notation of the song and also play along to a track. So, I learned how to remix a Scratch project.

Scratch is also an interactive community where you can view projects created by others and also remix them. Remixing is a process of using someone else's project as a starting point and altering things to make a new project. For my first remix, I used a xylophone created by another user and added a new background and playing track. I have embedded it below. Click the space bar to begin the audio track. You can use the numbers or the letters to play the pitches, but it is easiest to use the numbers since they are in chromatic order. Our kindergarten through 2nd grade have touch screen Chromebooks. They would be able to touch the bars to play. The touch aspect would also work well on tablets or iPads.


After I got a taste of remixing, I had to learn more. My next projects used a guitar and strumming chord patterns. I used "Monster Mash" to get students in the mood for Halloween. For those students who do not celebrate, I offered an alternative-"Don't Worry Be Happy".  I learned how to animate using motion. The bat and bird fly over the correct chords. The characters also have speech bubbles which tell the strumming patterns and the upcoming chord. Both projects are embedded below. Click the green flags to begin. You can use your letter keys to strum the chords or you could click the letters with your mouse or touch screen.


For the next project, I decided to combine the two options to play harmony and melody. I used the song "Skin and Bones". Students can play the Dm chord by clicking the guitar or using their space bar. The glockenspiel can be used to play the "Oo-Oo-Oo-Ooo" phrase. They can click the bars or use the number keys. Click the green flag to begin the audio track.


I'm sure I'm not done creating Scratch projects. I'll try to keep you updated. If you click the link below, you can view all the projects I have created in Scratch.

Music With Mrs. Dennis on Scratch


If you are interested in learning how to code with Scratch, you can follow these Facebook Groups.

Teaching With Scratch


Scratch For Music Educators

Friday, February 23, 2018

Intro To Melodic Improv


I am a member of the MusicEd Blogs Community on Facebook. We are collaborating for the month of February to share our best ideas for teaching melody! If you are not already following us on Facebook, you should click the link above. For today's post, I will give you some tips on how to teach melodic improvisation.

Improvisation! Does that word scare you? It used to scare me. I was not offered many opportunities to improvise as a student in school. Without experience and frame of reference, I had no idea how to approach teaching it. Thanks to my training in Orff Schulwerk, I have become very comfortable teaching melodic improvisation. I regularly provide opportunities for all my students to create and improvise both rhythmically and melodically. I hope some of the advice I explain below will help you feel more comfortable teaching improvisation.

1) Choose a Familiar Medium 

If you would like your students to improvise, they should have lots of experience playing or singing in unison on the chosen instrument. If you choose an instrument that is unfamiliar to the students, they may not feel comfortable or confident exploring their creativity. 

2) Start With Body Percussion

When presenting students with a new, challenging task, gradually ease them out of their comfort zone. Before I ask my students to improvise with pitch, they have lots of experience improvising rhythmically. Body percussion can provide a variety of sounds while still focused only on rhythm. Body percussion is also a great connection to something familiar. The 4 basic body percussion sounds are patsching (patting), clapping, stamping (stomping), and snapping. We first improvise on our "leg-a-phones" by patsching. Then, I allow them to have 2 sound choices--patsching and clapping. We gradually add stomping and then snapping. If I started with 4 sound options, they may be too overwhelmed. Remember to add only 1 element of change at a time. Start with a steady beat and then gradually add paired eighth notes or even rests. Improvising rhythmically with multiple body percussion sounds will make melodic improvisation with multiple pitches less intimidating.

3) Pentatonic Power

The pentatonic scale is a great place to begin with melodic improvisation. By removing fa and ti, there won't be any notes that "sound wrong". I use this "fake instrument" as a visual to show my students which bars to remove. When we are first improvising, we are mostly in the key of C so they know do (tonic) is the lowest pitch. But, I teach movable do and we often modulate to F and G. I also use la-based minor. If we improvise in minor, they know to end on la.


4) Limit the Freedom

Students will have greater chances of success if you limit their freedom of choice. Take baby steps. and gradually ease them out of their comfort zone. When I begin teaching melodic improvisation, I simplify the rhythm and begin with quarter notes only. I also limit the number of pitches the students can choose. We start improvising on one note do. Next, they can choose from 2 notes (do and re), but they must end on do. Then, they can choose from 3 notes- do, re, and mi. Eventually, they will have freedom to improvise with the entire pentatonic scale, but that would not happen in the first lesson. I also make sure they can feel the phrase length and successfully end on do before we add more complex rhythms like paired eighth notes. 


5) Provide a Framework

In addition to simplifying the rhythm and limiting the pitch choice, you should also provide a clear framework to structure the improvisation. I like to begin with short 4 beat phrases. In this example, I use the song, "Snowflakes". Each phrase begins with a skip from do to mi on the word "snowflakes". The full notation is below, but the lyrics are: Snowflakes gently falling, Snowflakes dance around, Snowflakes gently falling, Snowflakes touch the ground.


When we improvise to this song, I ask the students to repeat this phrase--"Snowflakes something else, Snowflakes end on G". During "Snowflakes" the students continue to play G and B as they did in the melody of the song. During "something else" and "end on", they improvise and choose any pitch in the pentatonic scale. Their final note must be G, which is tonic for this song. By alternating the improvisation with something familiar, the students are less intimidated. For a final performance, we would perform in ABA form. The "Snowflakes" song would be the A sections with the improvisations as a B section.

Another example can be found in a previous post with the book "Leap Back Home To Me". Students improvise on the phrase "Leap a-way" and then "Leap back home" This is the same rhythm with 3 quarter notes and a rest, but this time playing 2 measures at once. The phrases are still separated by a rest on beat 4 to provide a familiar structure. Eventually the phrases can get longer.

6) Rhythmic Building Blocks

When students can improvise successfully with quarter notes, you should add paired eighth notes. Orff utilizes speech to make rhythms seem more familiar to the students. We often pair 2-beat rhythm patterns with words and call them rhythmic building blocks or rhythmic building bricks. Here is an example of these rhythms with types of shoes--flip flop, tennis shoe, penny loafer, boot.


This activity was used with the poem "Cobbler, Cobbler". You can find more information about this lesson by clicking the link. Before improvising, we would compose 4-measure rhythmic patterns. Each student creates their own pattern to perform verbally and then notate. Before moving to the barred instruments, we choose one rhythm and notate it on the board. When we improvise, we are still in rhythmic unison performing the rhythmic phrase we notated on the board. After a few times experiencing this stage with different types of building blocks, I will give the students the opportunity to improvise with their own rhythm instead of a group rhythm. In order to end cleanly together, I always ask them to choose a quarter note and quarter rest as their last rhythm. This note will also be do. So, for the first 3 measures, it may feel like chaos, but on beat 4, we are in unison again. 

7) Gradually Shrink the Ensemble

Performing solo is very intimidating. Performing something you have created can make you feel even more vulnerable. So, here are some tips to gradually ease your students into improvising a solo.
First, they must be comfortable singing/playing in unison with the group, then in unison with small groups, in unison with partners, and finally performing a provided melody as a solo.

When approaching improvisation, continue the same pattern with large group, small group, partners, and soloists. On the barred instruments, I like to separate into 2 groups with woods vs. metals. For 4 groups, I separate like this: 1) glockenspiels; 2) soprano/alto xylophones; 3) soprano/alto metallophones; 4) bass xylophones/metallophones. You may separate differently based on your instrumentarium. You may choose to separate based on rows or numbers.

8) Differentiation

Differentiation seems to be an education buzz word in recent years. Improvisation is the best way to provide differentiation for your students. By letting the students improvise, they have the power to create a melody appropriate for their skill level. If they are struggling, they may stick to more simple rhythms and limit their choice of pitches. If they are more advanced, they may choose more complex rhythms and may explore more than one octave on the instrument. Remind the students that if they feel overwhelmed they can always simplify their rhythm or pitch options.

9) Self-Assessment

Exploration is usually unstructured and would consist of hitting random notes. Improvisation may begin as exploration but should move past that phase into purposeful musical choices. I provide a few questions for my students to assess their own performance.


Keeping a steady beat is important to feel the ends of the phrases. If your students cannot keep a steady beat while improvising, they need to simplify the rhythm or have fewer pitch choices. Ending on do is a must. In order to sound finished, we should end on the tonic. Lastly, they must ask themselves if their melody was sing-able. Could they try to sing and repeat what they just improvised? If they are leaping all across the keyboard, the likely answer is no. Encourage them to begin with stepwise movement, gradually adding skips or leaps. By giving them a rubric, you make them responsible to assess themselves and they will begin improving their performance each time.

10) Be a Model

My last tip for you is to BE A MODEL!!! If your students don't see you improvising, taking risks, and making mistakes, they won't be as confident to attempt their own improvisation. Create an environment that is safe and welcoming of all musical ideas. Show your students how to give praise to those who are succeeding and positive support to those who need extra guidance. If you are relaxed and comfortable, they will have fun and have no idea that melodic improvisation is supposed to be scary and difficult. Best of luck!!!

Coda

I hope you found something of value to help your confidence in teaching melodic improvisation! If you have any additional tips you would like to share, feel free to leave comments below. I would also love some feedback if you have done activities similar to these. If you would like more ideas about teaching melody, don't forget to follow our MusicEd Blogs collaboration for the entire month of February. You can find all past posts on the Facebook blog.


Wednesday, August 30, 2017

Welcome Back, Class: A Review Unit


To start the year, I plan a unit that will review many musical elements and dust off the vocabulary they may have forgotten over summer. This is a 3-lesson unit for 4th grade which will get the students playing rhythms, singing a melody, playing harmony, improvising, and composing. Here is an overview:

Lesson 1:

I begin the unit with body percussion, including patting, clapping, rubbing, and stomping. We review rhythmic durations by viewing the notation on the board including quarter note, half note, eighth note pairs, and quarter rest. I review dynamics by adding a crescendo on the 3rd phrase. We review the element form and perform the poem in a 2 part round with voices and body percussion. Then, we review timbre and add hand drums.

Lesson 2:


The Remix!!! We review the poem and discuss the musical elements. We discover we were missing melody and harmony in our previous lesson. We echo solfege and review the lines and spaces on the staff. We perform the melody on Orff instruments. We add a broken bordun for harmony. I have the students echo a rhythmic phrase "Fourth Grade Rocks!" They improvise with that phrase twice. I give them parameters for their improvisation. The first phrase CANNOT end on do (C). The second phrase HAS to end on do (C). We perform the improvisations in small groups: 1) glockenspiels; 2) alto/soprano xylophones; 3) metallophones, 4) basses. Our final performance is ABA form with the improv sandwiched between the song.


Lesson 3:

We compose! The students match school subjects with the correct rhythmic building block. I ask them to create a phrase using 8 books. I give them some parameters for composing. I ask that the last book be a rhythm with quarter note and quarter rest. I also ask that the phrases begin with the same 2 books. (Books 1 and 5 should be identical and books 2 and 6 should be identical). The students first get in small groups and use manipulatives to compose. Using manipulatives first saves the erasers on my pencils!!! When the group can perform the poem both verbally and with body percussion, they are given a worksheet to notate their patterns. When everyone is finished with their worksheet, we do a final performance in rondo form sharing the book compositions. We alternate the "Welcome back, Class" poem with each individual group.


This unit is always great fun! After only 3 lessons, I can say my students have used body percussion, played drums, played xylophones, used expressive speech, used their singing voice, performed in round, with ABA form, and rondo form, improvised melodically, and composed rhythms! It is a great way to start the year!


If you are interested in teaching this unit, you can search my TpT store for full lesson plans, PowerPoints, printable worksheets, and manipulatives.


Monday, February 16, 2015

"Fishing For Pitches" Music Center

All summer, I scavenged yard sales, Goodwill, consignment shops, and peddler
malls for board games that could be converted into music centers. On my list was the classic battery powered fishing game called Let's Go Fishin'. While I never found that particular version of the game, there are several licensed adaptions.


I happened to find two games from the Disney movie Cars. One was at a Peddler's mall and one was at a consignment shop. I paid less than $3 for each of them. Instead of fish, this version of the game has the player fishing for tires.


First, I labeled the bottom of the fish with the letters of the musical alphabet (ABCDEFG). Since there are 21 fish/tires in each game, it worked out nicely that there would be 3 of each pitch. Since my tires were black, I printed letters on mailing labels. If you acquire the actual fishing game, a black Sharpie would work perfectly fine.


One game I purchased was missing the fishing poles, so I created new poles using pipe cleaners and straws. Actually, the strings from the original game tangle so easily, I also replaced those with straw and pipe cleaners poles.

Fishing For Pitches

For 2-3 players

Objective: Be the first player to catch a fish matching the pitch of  a note on the staff.

1) Draw a card to select a note on the staff.
2) All players race to fish and catch the name of the pitch.
3) The first player to catch the correct pitch is the winner.


I also created a more advanced version of the game . . .

Fishing For Chords

For 2-3 players:

Objective: Be the first player to catch 3 fish spelling the chord on the staff.

1) Draw a card to select a chord on the staff.
2) All players race to fish and catch the three pitches names.
3) The first player to catch three fish which spell the chord on the card is the winner.


The cards for both versions of the game are available for download on my Teachers Pay Teachers store. It is best to print double-sided on cardstock and laminate for durability. The games are available to download separately or as a discounted combo pack.


Thursday, October 23, 2014

Arts Integration: Line and Melody


In addition to music, I also teach visual art. My student teacher for the fall, Ms. Reed, had a very short placement (only 8 weeks). I didn't want the time in the art room to impede her learning and experience teaching music. So, we decided to integrate art and music for those lessons. 
 
We compared the art element LINE to the contour of a MELODY. Fourth and fifth grade students got to choose their favorite song and draw the shape of the main melody. They practiced drawing the lines with small chalkboards. Ms. Reed and I walked around the room and asked each student to sing their song while tracing their finger along the line. We offered suggestions to change the melody, if needed, to make it more accurate. The students chose a piece of construction paper from an assortment of pastels. The students drew their melody line and then added additional lines in the background in attempt to hide their melody. The chalk lines should be very thick to prevent paint colors from mixing.
 
After drawing the lines, the students used watercolors to paint each section. Some chose to create color patterns while others preferred a random method. It took two 50 minute classes to begin and finish this project. We began painting in lesson 1. At first, the students were disappointed in the darkness of the watercolors. At the beginning of lesson 2, they were able to see how the colors are more vibrant when they dry. They also enjoyed comparing how colors looked different on different colors of construction paper. (Yellow paint on green paper looks different than yellow paint on pink paper) The original plan was to wipe the chalk away and reveal the background color of the paper. But, most students liked the chalk and didn't want to wipe it away.
 
If you are fortunate enough to have an art teacher at your school, this would be a great opportunity to collaborate! Students could draw their melody lines in music class and complete the chalk and painting in the art room. I really fell in love with this project because each student created a beautiful work of art that was truly unique. I try to plan lessons that give the students freedom of creativity to influence the outcome of their art. The response papers allowed students to comment on something they loved about their art and something they wish they could do better. One student commented that she loved "how we could make it our own". This was great reassurance. For that moment, I could pretend that I was a real art teacher and not just a music teacher pretending to be an art teacher. ;)


UPDATE:
This post was featured on Fermata Fridays
on September 18, 2015.


Saturday, January 18, 2014

Free Apps For Young Composers


I have found two more free apps that allow young students to explore music composition.

Tune Train

The first app is called Tune Train. There are 10 musical worlds available to explore.  Each world features a different musical style.

 iPad Screenshot 5
On each beat, you see people high and low. They essentially outline a chord. You use the train to draw a path and select people/notes you want in your melody. If you want to omit a note on that beat, you can make the train bypass that stop completely. This gives you options to alter the rhythm as well. Each student could create a truly unique song even if they selected the same musical world.

iPad Screenshot 2

You can also view the actual music notation at the top of the screen.

iPad Screenshot 4

Here is a video demonstrating the app:


___________________________________________________
Music4Kids
The second app I have found is called Music4Kids. In this app, you see an actual treble clef staff. When you place a note on the staff, the pitch name also appears above it. Each note defaults as an eighth note. To make longer durations like quarter and half notes, you must hold your finger on the screen for a longer time.
iPhone Screenshot 1
There are 5 different musical planets available: birdy, hamster, octopus, fox, and ghost.
iPhone Screenshot 4
There is an option to save your composition to your "My Tunes" library. This may be a helpful tool for teachers. If students create a song during class, the teacher can go back through later to view what their work.

There is also a part of the game called "Challenges." This is a simple introduction to melodic dictation. Initially, the app will show you the music notes and play the melody. Then, you must notate the melody. If you need help, you may listen to the tune again, but it will not show the notation a second time.
Here is a short video demonstrating the app:


___________________________________________________

Both apps are very kid-friendly and easy to navigate. The fact that they are free is also a wonderful bonus! I look forward to using these in the classroom.

Saturday, December 14, 2013

Nutcracker Resources

I have been teaching the Nutcracker for many years and my resources continue to grow!

The Story

My favorite book to share is a pop-up book that I got on sale one year in February for $3.99. Unfortunately, it is currently out of print. If you happen to see it in a used bookstore, snatch it up! Here is the full information:
The Nutcracker: A Magical Pop-up Adventure
Published by Macmillan Children's Books 2003-10-17, 2003
ISBN 10: 033396134X / ISBN 13: 9780333961346

The students are in awe of this pop-up, especially the spinning sugarplum fairy at the end!

Lesson Ideas

During my first years teaching the Nutcracker, we did little more than read the book and then dramatize the story with a few props and music selections. A couple years ago, I purchased a new resource book to create lessons with more music connections.
Nutcracker Suite
Active Listening Strategies for the Music Classrooom
By Wesley Ball
Book and CD (
$19.99 at westmusic.com)
.It includes many lesson ideas with a variety of activities. There are listening maps, printable worksheets, and a music cd. My favorite activity suggested by the book uses music from the March. When the students hear the trumpets, they are locomotor and march around the room. When they hear the strings, they are nonlocomotor and wave a scarf in the air. During the B section, when they hear flutes, they crawl on the floor and pretend to be mice. Many of the lessons encourage active listening and suggest activities to get the students engaged.

The Ballet

I always show portions of the full-ballet on video, skipping through the longer dance numbers due to time constraints. I was recently introduced to blubbr.tv and decided to use that site to create an interactive quiz. (To learn more about Blubbr follow this link.) I created 2 quizzes, one for each Act. The questions cover some basic music terms such as melody, harmony, dynamics, tempo, and instrument families. It introduces some basic ballet terms--pointe, plié, pirouette, and passé; and some basic theatre elements--costume, prop, scenery, and special effects. The video clips were taken from a YouTube video from a 2008 performance by the Royal Ballet. Follow the links below to find the quizzes.

Art

I also teach visual art once a week and stumbled across a few Nutcracker art projects on Pinterest. The students could be working on these projects while watching the ballet or listening to the music.
Grades 2 through 5 have had fun learning about symmetry making this project. We discuss how the ballerina has linear symmetry and the snowflakes have radial symmetry. Follow the link to the original post on krokotak.com for some printable templates and easy tutorial pictures.


Older students can practice symmetry by drawing Nutcrackers. This would take quite a bit of time to finish and would require more teacher guidance. I have not attempted this with students yet. I haven't had the time to invest in this project. If you have an art teacher at your school, perhaps you can suggest a collaborative unit. More sample pictures are featured on the original blog post at "A Faithful Attempt".


The younger students enjoy making these finger puppets. The free printables can be found on the website of the Birmingham Royal Ballet. To save paper, before copying I eliminated the instruction on each page to fit all 3 finger puppets on one page.  You can see this layout in the top picture of this post.
When searching for the original source for these finger puppets, I noticed they also have a new pair of finger puppets available and a project for a miniature theatre!

Coda

My students are always excited to see my Nutcracker sitting on the edge of my desk, but I think I may be more excited than them. I love the magic of the Nutcracker and look forward to teaching it every year!  Do you teach the Nutcracker? What are your favorite activities?
My 4 year old daughter is now in ballet class. Next year, we will start a tradition of seeing the Nutcracker live on stage. I can't wait!

Friday, December 13, 2013

Music Centers

During the week of Thanksgiving Break, I didn't want to start a lesson or unit when I wouldn't see all the classes of the week. So, we experimented with music centers. I have 50 minute classes, so I chose 4 centers. It took about 10 minutes to explain the games and then students travelled in groups and had about 10 minutes at each center. They seemed to enjoy them, so I will definitely try this again later in the year with all the classes. Once the kids have tried the centers, they would be great for emergency sub plans!

Giant Staff Twister


In a previous post, I shared the activity where we did relay races with our giant floor staff. Jen Fink, at pianamation.com, has used the floor staff to play a modified game of Twister. She created cards you can use for the game, one deck contains body parts (hands and feet) and one deck contains lines and spaces and they are available to print from her blog. We decided to make the game like traditional Twister and create spinners. The spinners are available on my teacher-pay-teacher store.


Boomwhacker Center


In the Boomwhacker center, students practiced note reading. They took turns playing songs from the book "Whack-a-Doodle-Doo!" I have 2 copies of this very affordable book ($5.95 from westmusic.com) One student would attempt to play a song. The next student in line would be able to flip through the extra book to select the song they would like to perform for their turn. This book includes colored notation made it easy for the older students to perform the songs. The younger students needed assistance, so my student teacher positioned herself at that center.

Connect 4 Composition

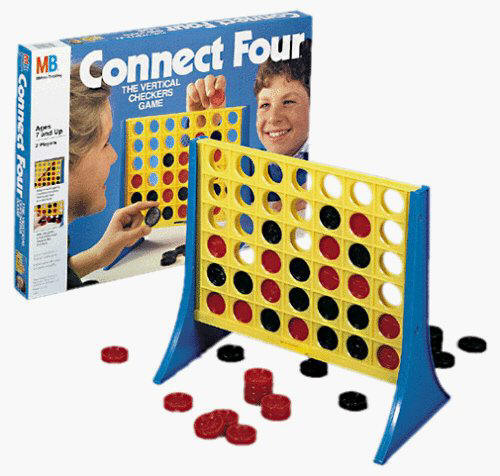
The younger grades used a Connect 4 game for rhythmic composition. They took turns filling the bottom row with checkers.  The red checkers represented a sound and the black checkers represented a rest. The students performed the rhythms on lollipop drums. Unfortunately, I did not get a picture of the younger students in action at this center.
For the older students, I used a more advanced game, Connect 4 x 4, with 4 different colors--red, yellow, green, and blue. I selected a few unpitched percussion instruments and the students would decide which instruments would play for each color. The students took turns creating new compositions and experimenting with different timbres at the same time. This version of the game has full and empty checkers. I forsee these representing quarter notes and half notes at some point in the future. (Connect 4 x 4 can be found on walmart.com for $19.86)


Technology Center

The technology center used the Interactive whiteboard and the iPad. On the Activboard, the students took turns on a game from nyphilkids.org. The game pictured below is "Music Match Instruments" which is a memory-type card game. I have also collected links to many other music sites and they can be found at this link.


They students could also play a music game on the iPad. Make sure you check out a previous post sharing 110 free music apps for the iPad. Kindergarten and 1st grade were playing rhythms on Monkey Drum. 2nd and 3rd grade were reading rhythms on Rhythm Cat. 4th and 5th grade were testing out a new app Cookie Beats. Look for a review of this app coming soon!


I have dedicated an entire Pinterest board to 
Check it out for more great ideas!


Friday, November 15, 2013

Buzz, Ollie, Luke, and Lori

I see my students once a week for 50 minutes. Yes, even kindergarten! There have been some recent conversations on a Facebook Music Teacher board concerning lesson planning when you have kindergarteners for an extended time. This post will share a few of my tips when lesson planning for kindergarten.

I usually try to plan 3 different activities for my kindergarten classes in order to keep their attention and minimize discipline issues.  I include a variety of activities in each day which could include a listening activity or book, singing, instruments, movement (locomotor or nonlocomotor), dramatic play, dancing, play party games, etc. Today, I'm going to share a few books that are written with a specific goal to introduce a musical concept. I may begin a lesson with a book or use it as a transition activity between songs or games.

The first books I purchased were the Buzz and Ollie books.
There are 3 books in this series.  In Buzz and Ollie's Steady Beat Adventure, the kids travel to their grandparents' house and discover lots of environmental sounds that make a steady beat like windshield wipers, a clock, and a dripping faucet. In Buzz and Ollie's High, Low Adventure, the kids get lost in the forest and meet lots of animals giving them directions. But, they were told they should only follow the sounds that are low to find their way back home. The animals with high sounds are trying to trick them. In Buzz and Ollie's Loud, Soft Adventure, the kids hear quiet sounds like a baby bear snoring and then loud sounds like a bear roaring. The symbols for piano and forte also appear in the book.
I bought the hard cover books about six or seven years ago from westmusic.com for 14.95 each. Unfortunately, these books are currently out of print. However, you may find some used copies online for a variety of prices.

Another great book that is still in print is Luke & Lori's Musical Journey. You can find it at westmusic.com for $19.95.


This book is a collection of 4 short stories. They could be read all together or you could read each story by itself. Luke and Lori, the main characters in the book, introduce the basic elements of music as they take a musical journey and meet different people who teach them about long and short sounds, tempo, dynamics, and high and low sounds. 

As I said before, I try to plan a variety of activities for kindergarten classes to prevent discipline issues. Even if I cannot plan a movement activity in my lesson, sometimes simply changing locations in the room can help keep the wiggles to a minimum. Most of the time, my students are sitting around the edge of my solid blue square carpet facing the boards. When I have a book to share with the students, they get to sit on my alphabet carpet and face the back of the room near my desk and keyboard. The rule is only one person per square and everyone must be sitting criss-cross applesauce on their bottom so everyone behind them can see. Below, you can see a picture of my carpets. (For a full tour of my classroom, check out this previous post.) .

My students love these stories. I try to include one story every few weeks throughout the entire year. They would be great for a substitute teacher as well! Do you have any of these books? If so, share your ideas and opinions below!


Coda: An afterthought regarding the carpets. The solid blue rug and the alphabet carpet are actually touching because the older kids are too big for one carpet and must sit around the edges of both carpets