Saturday, January 31, 2015

Monthly Newsetter from the Music Room

This year, our principal asked our special area teachers for ways to better communicate with parents. In addition to updating our classroom blogs more regularly, we decided to send home monthly newsletters.

Reducing Paper

I had never thought of starting a newsletter in the past because it seemed like a waste of paper to send home a newsletter with every child in the school. But, in efforts to save paper, our school started an email distribution list. Each family may choose to receive all school communication via email rather than the weekly Tuesday Take Home folder. The principal scans all letters, flyers, lunch menus, etc. into one big pdf file each Tuesday morning and forwards the attachment to the classroom teachers. Each classroom teacher then forwards the email to their parent distribution list. If a family has not signed up for the email list, they will still receive paper copies in the traditional Tuesday Take-Home folder. But, in efforts to avoid sending multiple copies of the same information, only the oldest child in each family will receive the information.


Music Newsletter

Our special area newsletters go home at the beginning of each month. I named my newsletter "Notes from Mrs. Dennis". The librarian named her newsletter "Pages from Mrs. M_____".  The PE teacher named his newsletter "Playbook from Mr. _____." Our STEM (science technology engineering math) teacher named her newsletter "Updates from Mrs. ____"


Each newsletter features a greeting from the teacher with any special information for the month. There is a box for each grade level summarizing what the students learned in the previous month. I also included a section "Ask Me To Sing . . ." and listed the songs we had learned in class. The other teachers changed their sections to "Ask Me About . . ." and listed vocabulary words and concepts they had covered in the previous month.


The back page of the newsletter features photos of students engaged in classroom activities. My photos are interactive videos which come to life with the Aurasma app. (If you have not seen my previous posts on Aurasma, follow this link.)


Download the Template

If you would like to create your own newsletter, I have a template available for download if you want to save some time formatting. Just edit the red text to customize it for your classroom.


My newsletter uses a font AR Christy which may not be preloaded on your computer. But, don't worry, it is available for free download at the following link: http://fontzone.net/font-details/ar-Christy


Snowman Chords and "Let It Go"


Do you still have Frozen Fever? Most of my students, and some teachers, are still obsessed with Frozen!  (Theresa, I'm calling you out!) I saw a post by Dyan Robson using snowmen to build chords on a staff. I immediately saw an opportunity to teach a lesson using music from the movie Frozen. Her blog post can be found at this link.


A snowman is the perfect visual for a triad chord in root position. I created an interactive door display to get students excited about the lesson. I reused some decorations from my daughter's Frozen-themed birthday party. I traced Olaf onto a poster board using the projector and painted his outline. (At the party, he was used for a game of "Pin the Nose On Olaf".) The door engages the students to learn about the chords. They can quiz themselves to match the letter names to the snowman chords. They lift the flaps to check their answers.


I taught the chord lesson to my 5th graders. They reviewed note names by labeling the chords.
We reviewed the concept of major and minor by listening to some chords used in the song "Let It Go." The students played the chords on Boomwhackers, but I also played the chords on the piano to make it easier for them to hear. Even though I displayed the chords in root position, I added octavator caps to A flats, B flats, and B naturals.


The students were seated in a horseshoe shape and I distributed the Boomwhackers in order chromatically. The students were responsible for looking for their pitch name. Those students with chromatic Boomwhackers knew to look for both sharp and flat equivalencies. We practiced the chord progressions and then played along with "Let It Go" via a YouTube video.


I had to remind the students not to sing along unless they already had the song memorized. Often they would be busy trying to read the lyrics and missed their turn to play the harmony.

At the end of class, students completed an exit slip naming the pitches of some snowman chords.


My interactive flipchart is available for download on Promethean Planet. If you do not have an Activboard, the still images from those slides are available on Teachers Pay Teachers and included in a combo pack with the bulletin board printables and exit slip assessment.

Shake It Off!

I love Jimmy Fallon and the Tonight Show! Occasionally, Jimmy and the show's band, The Roots, perform popular songs with one of their musical guest using elementary classroom instruments. If you are not familiar with these videos, just search "Jimmy Fallon classroom instruments" on YouTube or follow this link. https://www.youtube.com/results?search_query=jimmy+fallon+classroom+instruments
Inspired by Jimmy Fallon, I would like to share some awesomeness from a colleague and good college friend, Jamie Albritton. He and his staff stayed afterschool yesterday and learned an Orff arrangement for Taylor Swift's "Shake It Off". I have already begged Jamie for the notated parts and will share them with you if I am granted permission. In the meantime, enjoy their performance!

https://www.facebook.com/video.php?v=10101370711994354&pnref=story

Saturday, January 17, 2015

Guess Who: Music Instruments


I have planned lots of new music centers for this year and my students have really enjoyed them. I will be blogging more about the centers soon. This first post will be about a modified version of the classic Guess Who.

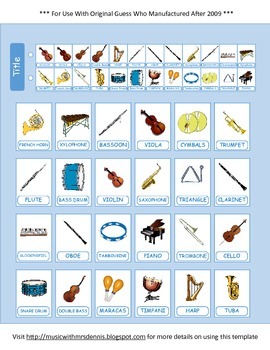
I scavenged yard sales, consignment shops, and Goodwill all summer on the look out for games that could be modified for music centers. I found two of these electronic Guess Who games for dirt cheap. This version is technically called Guess Who Extra and features 3 rows with 8 windows in each row. One was at Goodwill for $1.50. The other was at a children's consignment shop for $2.50. Over the summer, I saw a pin on Pinterest where someone modified Guess Who to reinforce US presidents and other historical figures. When I saw these versions, I immediately thought of a musical adaptation. This would be a great way to compare and contrast music instruments.

Object
Guess your opponent's mystery instrument before they guess yours.

How To Play
1) Each player slides the plastic window over to secretly select a musical instrument.
2) Players open all the doors to reveal the instruments.
3) Players take turns asking "yes" and "no" questions to help them narrow down the choices of instruments.
 4) Players only have one chance to guess the specific name of the instrument. If they guess wrong, their opponent wins.

I also included an Instrument Fact Sheet to assist students when asking and answering questions.
Before beginning the center rotations, I demonstrate each game. I shared many examples of questions with the students and they took turns asking questions to discover a mystery instrument I selected.
Some example questions included:
Does your instrument belong to the percussion family? (string? woodwind? brass?)
Is your instrument made of wood? (metal? plastic?)
Does your instrument make a pitch?
Do you play your instrument with both hands?
Do you use your mouth to play your instrument?
Could your instrument fit into a backpack?
Does your instrument have a reed?


I also created a game board using the classic version of Guess Who which features 4 rows with 6 windows in each row. This version was manufactured in 2009 or later.  


Both versions of the game are included in one PDF file and are available for download in my TeachersPayTeachers Store. I suggest printing in color on cardstock and laminating for extra protection.


 Do you have another idea for a Guess Who game? I have blank templates available so that you do not have to do all the precise measuring. All you have to do is fill in the boxes with text and pics. Both templates are available to download and edit using Microsoft Publisher.


I know your students will have fun using Guess Who to learn about instruments and other content. Keep your eyes open at second-hand stores and you can snag the games for super cheap. You may even get some donations by sending out a request to parents. Good luck on your hunt!


Saturday, December 20, 2014

In Memory of Doc T

In Memory of

Dr. Michael Tunnell

1954-2014


I am deeply saddened to hear that my former trumpet professor, Dr. Michael Tunnell, lost his battle with cancer yesterday morning. He was always full of kindness and compassion and had the most gentle heart. Doc T actually played a major role in shaping my career and future.

In March 2001, I was a country girl from a small town with no history of private music lessons. I sat in his studio with my tarnished trumpet scared to death. I felt so out of place. I have no idea what he saw or heard that day, but I am forever thankful that he offered me a music scholarship. Combined with an academic scholarship for good grades, I was able to graduate with my bachelors in music education completely debt free.

Attending the University of Louisville opened many doors which shaped who I am as a musician, who I am as an educator, and who I am as a person. I cannot imagine what my life would be like today if Doc T had not decided to invest his time (and the school's money) on this small town girl. Doc T, thank you for making me a Louisville Cardinal. I hope I bring honor to you and to the university as I continue my career as a music educator.

Rest in peace, Doc. May God be with the Tunnell Family.

Follow this link for his full obituary.

Thursday, October 23, 2014

Arts Integration: Line and Melody


In addition to music, I also teach visual art. My student teacher for the fall, Ms. Reed, had a very short placement (only 8 weeks). I didn't want the time in the art room to impede her learning and experience teaching music. So, we decided to integrate art and music for those lessons. 
 
We compared the art element LINE to the contour of a MELODY. Fourth and fifth grade students got to choose their favorite song and draw the shape of the main melody. They practiced drawing the lines with small chalkboards. Ms. Reed and I walked around the room and asked each student to sing their song while tracing their finger along the line. We offered suggestions to change the melody, if needed, to make it more accurate. The students chose a piece of construction paper from an assortment of pastels. The students drew their melody line and then added additional lines in the background in attempt to hide their melody. The chalk lines should be very thick to prevent paint colors from mixing.
 
After drawing the lines, the students used watercolors to paint each section. Some chose to create color patterns while others preferred a random method. It took two 50 minute classes to begin and finish this project. We began painting in lesson 1. At first, the students were disappointed in the darkness of the watercolors. At the beginning of lesson 2, they were able to see how the colors are more vibrant when they dry. They also enjoyed comparing how colors looked different on different colors of construction paper. (Yellow paint on green paper looks different than yellow paint on pink paper) The original plan was to wipe the chalk away and reveal the background color of the paper. But, most students liked the chalk and didn't want to wipe it away.
 
If you are fortunate enough to have an art teacher at your school, this would be a great opportunity to collaborate! Students could draw their melody lines in music class and complete the chalk and painting in the art room. I really fell in love with this project because each student created a beautiful work of art that was truly unique. I try to plan lessons that give the students freedom of creativity to influence the outcome of their art. The response papers allowed students to comment on something they loved about their art and something they wish they could do better. One student commented that she loved "how we could make it our own". This was great reassurance. For that moment, I could pretend that I was a real art teacher and not just a music teacher pretending to be an art teacher. ;)


UPDATE:
This post was featured on Fermata Fridays
on September 18, 2015.


Wednesday, October 22, 2014

Recorder Playing Tests


Several people have asked on music teacher Facebook groups how others handle playing tests for recorders. Here is an overview of how I assess recorders . . .

Procedures


I teach recorder in 4th grade. For each unit, I provide at least 3 songs with varying difficulty. (Buzzword: DIFFERENTIATION!) I don't follow any particular recorder method book. I have gathered songs from several books, from my Orff levels courses, and from various workshops and conferences over the years. Lessons in the unit may also involve games, dancing, or playing accompaniments to the songs on barred instruments.

At the end of the unit, I hear each student perform one of the songs for a playing test. On test day, the students rotate in centers. My classes are 50 minutes long. I try to allow 10 minutes at each station. That leaves 10 minutes for instructions at the beginning of class and maybe a couple minutes of clean-up before they line up to leave.

One center is the playing test where I am stationed. I hear each student in the group perform a song and then I tie their strings before they rotate to the next center. I used to hear students one at a time and it took a long time for students to come back to me and then go back to their seat. Many times, students would be very nervous playing for me it would take forever to get them to even begin their song. In small groups, it seems less formal and the students are also very supportive of each other. While I'm formally assessing them on the rubric, they are watching their peers and offering suggestions like--"Your thumb hole wasn't covered all the way." and "You didn't have your right thumb kickstand."


Before they play for me, there is a center with an exit slip or short quiz assessing any new vocabulary or concepts we learned in the unit. These students have finished their written assessment and are working in small groups preparing for their playing test.


Two other stations are games or activities which reinforce music skills taught in the unit. This was the first recorder playing test and we are still learning the lines and spaces of the staff. The students chose either relay races or Twister with the giant floor staff. The next station was Treble Toss where students draw a popsicle stick and then aim their beanbag at a specific line or space on the staff. If you would like to learn more about my music centers, follow this link to previous blog posts.


Rubric

My rubric addresses posture, breathing, fingering, hand position, steady beat, rhythmic accuracy, and pitch accuracy. If you would like to download my Recorder Rubric, click here. If I need to save time before the rotation ends, I wait for class to finish to add up the scores.


Incentives

For each note the students learn, they receive a different colored string tied on to their recorder. I use embroidery floss cut to 12 centimeters. I sometimes have students or parent volunteers cut the strings for me. After the strings are tied, the students love to fray the ends. Some units introduce two notes, so the students would get two colors. Some units introduce only one note, so the students would get one string. We start on red and follow the order of the color wheel. The last string is a black string. There is a bonus string in the last unit. The last note we learn is F#. If the students can play "Frere Jacques" (in the key of D) in a round with a partner, they get a gold metallic string tied on their recorders.


I store the strings in my organizer station. Each color has its own drawer. I also have drawers for office supplies like paperclips, sticky tack, rubber bands, pushpins, etc. This organizer sits on a bookshelf behind my desk and makes things so easily accessible. Follow this link for more information on how I organize my classroom, including printable labels for your own organizer.


If you have any questions or suggestions, feel free to comment below!