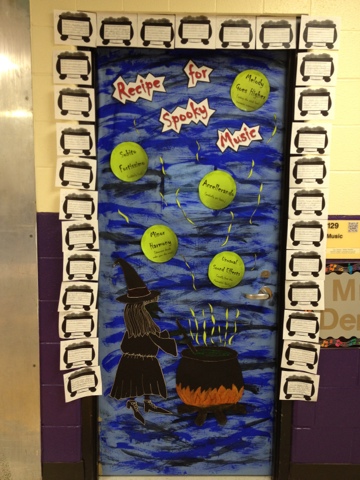
Our PTO is throwing a Halloween Door Decorating Contest again this year. I won the contest a few years ago and decided to step it up again. Here is a link to my posts if you missed them.
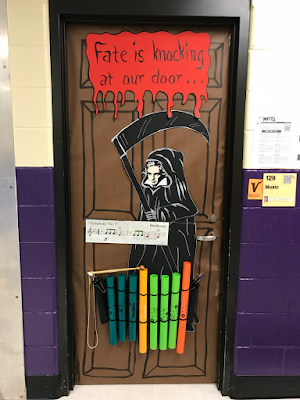
My door is inspired by Beethoven's 5th Symphony. "Fate Is Knocking At Our Door..."
Beethoven appears as the grim reaper. The music for the fate motive is printed and color coded to match the Boomwhackers. The Boomwhackers are held in xylo-tote and large binder clips. The clips are hung with 3M Command Hooks.
The door is a hit with students. I hear them stopping by before school, afterschool, and even sneaking during the day to come play Beethoven's 5th. I'm sure I may be driving my neighboring teachers crazy, but it makes me smile every time.
This year I decided to try an instrument petting zoo for Back-to-School night. It was a great hit and I plan to do it again for our conference night.
I borrowed some hula hoops from the gym teacher (in rainbow colors, of course) and arranged them in a circle on my carpet. I placed a variety of instruments in the hoops. The first picture below shows common instruments that I set up for the kindergarten orientation. I chose a lollipop drum, maracas, cowbell, woodblocks, guiro, and triangle. For grades 1-5, I decided to pull out instruments the students don't get to play as often. I chose a ukulele, thunder tube, tubano, Boomwhacker xylophone, suspended cymbal, and temple blocks.
I invited the students to stand beside a hula hoop on the outside of the circle. When they heard the bell tree, they could play their instrument. When they heard the gong, they had to stop and place their instrument back in the hoop. When they heard a glissando on the xylophone, they would rotate to the next hoop. Placing them in hoops helped establish boundaries so the instruments were protected during transition time. Everyone that stopped by loved the petting zoo. It was a great chance for them to explore, but also practice their listening skills.
Before my next zoo exhibit, I have upgraded my visuals. I have created a slideshow to display with easy visual instructions. I hope this saves me from explaining the rules to each new visitor. I also created some paper signs to hang on the instruments to represent "play", "stop", and "walk". I have also created signs to hang around the school to invite students to visit the petting zoo.
If you are interested in displaying an instrument petting zoo, you may find my resources on Teachers Pay Teachers. There is a zipped file with the slideshow and printable signs. Enjoy!
To start the year, I plan a unit that will review many musical elements and dust off the vocabulary they may have forgotten over summer. This is a 3-lesson unit for 4th grade which will get the students playing rhythms, singing a melody, playing harmony, improvising, and composing. Here is an overview:
Lesson 1:
I begin the unit with body percussion, including patting, clapping, rubbing, and stomping. We review rhythmic durations by viewing the notation on the board including quarter note, half note, eighth note pairs, and quarter rest. I review dynamics by adding a crescendo on the 3rd phrase. We review the element form and perform the poem in a 2 part round with voices and body percussion. Then, we review timbre and add hand drums.
Lesson 2:
The Remix!!! We review the poem and discuss the musical elements. We discover we were missing melody and harmony in our previous lesson. We echo solfege and review the lines and spaces on the staff. We perform the melody on Orff instruments. We add a broken bordun for harmony. I have the students echo a rhythmic phrase "Fourth Grade Rocks!" They improvise with that phrase twice. I give them parameters for their improvisation. The first phrase CANNOT end on do (C). The second phrase HAS to end on do (C). We perform the improvisations in small groups: 1) glockenspiels; 2) alto/soprano xylophones; 3) metallophones, 4) basses. Our final performance is ABA form with the improv sandwiched between the song.
Lesson 3:
We compose! The students match school subjects with the correct rhythmic building block. I ask them to create a phrase using 8 books. I give them some parameters for composing. I ask that the last book be a rhythm with quarter note and quarter rest. I also ask that the phrases begin with the same 2 books. (Books 1 and 5 should be identical and books 2 and 6 should be identical). The students first get in small groups and use manipulatives to compose. Using manipulatives first saves the erasers on my pencils!!! When the group can perform the poem both verbally and with body percussion, they are given a worksheet to notate their patterns. When everyone is finished with their worksheet, we do a final performance in rondo form sharing the book compositions. We alternate the "Welcome back, Class" poem with each individual group.
This unit is always great fun! After only 3 lessons, I can say my students have used body percussion, played drums, played xylophones, used expressive speech, used their singing voice, performed in round, with ABA form, and rondo form, improvised melodically, and composed rhythms! It is a great way to start the year!
If you are interested in teaching this unit, you can search my TpT store for full lesson plans, PowerPoints, printable worksheets, and manipulatives.
I hope you don't mind brief trip into my world as the visual art teacher. Six years ago, I was asked to teach art in addition to music. I was clueless. I consider myself a crafty person, but had no background in teaching art. My elementary school did not have an art teacher either. Despite my lack of formal art education, many of my teachers found ways to integrate art. In my 8th grade math class, Mrs. Armstrong taught us how to make tessellations. It is a project that I have never forgotten.
A tessellation is a shape that can be repeated over and over. It interlocks with itself without overlapping or leaving any gaps. We created tessellations by starting with a cardstock square. We cut some designs on 2 sides and taped them to opposite sides. This would become a stencil to trace again and again. I wish I had my original project, but I remember it looking like an elephant. Below, is a video that is uses similar steps to create a tessellation.
I have taught this lesson to my 5th graders since the first year I began art. This year, tessellations inspired the 5th grade collaborative art project. This is the 4th year we have created a piece or art for the exiting class to leave their mark on the school. To see other collaborative art projects, click this link.
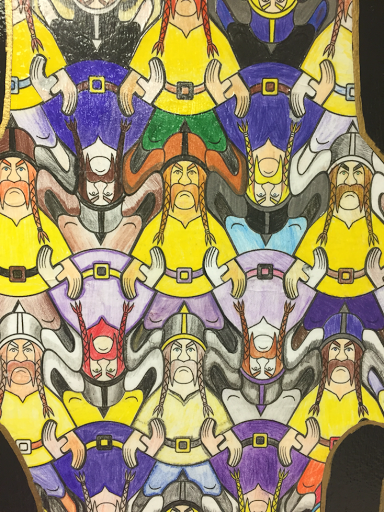
While searching for ideas on the internet, I discovered a Viking tessellation by French Artist, Alain Nicolas. Vikings are our school mascot, so I wrote to him requesting permission to use his design for our project. He granted permission and sent me a pdf file of a single Viking.
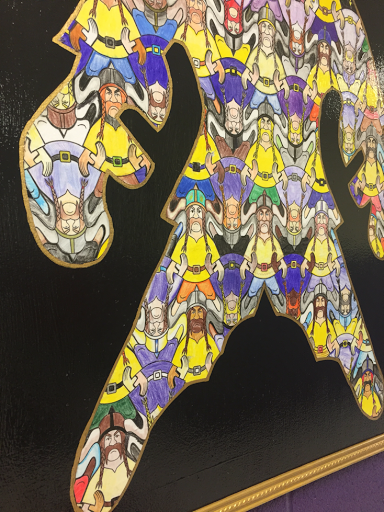
Each student colored a single Viking. I knew the project would need to be sealed with Mod Podge. I was afraid that markers would bleed and waxy crayons would resist the sealant, so the students used colored pencils. I encouraged them to use heavy, medium, and light pressure to create a change in value and make the Vikings appear more 3-dimensional. We had practiced this technique in a past lesson drawing Nutcrackers.
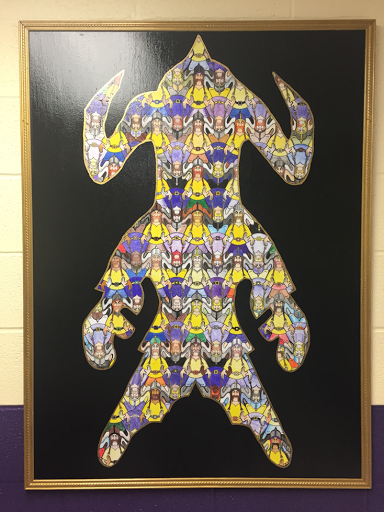
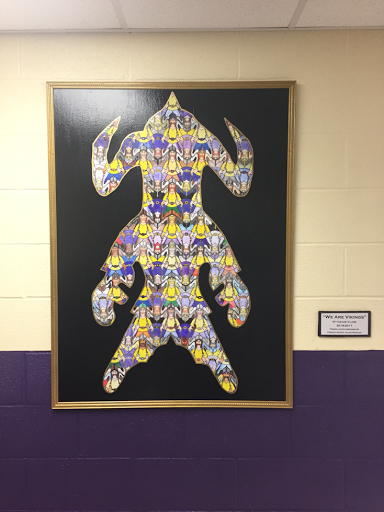
I purchased utility plywood which is very sturdy, yet thin and lightweight. I painted the board black using some leftover latex paint. We purchased some trim, painted it gold with acrylic craft paint. A fellow teacher used his miter saw to cut the trim and we glued it to the edges for a frame with wood glue. Each individual Viking was cut out to fit together like a jigsaw puzzle. At first, I planned for the project to be a rectangular shape. But, a coworker suggested the tessellation also be in the shape of a giant Viking and I fell in love with the idea! I projected a single Viking on the board and used a white crayon to trace the outline. I painted a thin layer of Elmer's Glue All and started filling in the large Viking with smaller Vikings. Many small Vikings would get trimmed to fit the outline of the large Viking. But, arms, legs, and heads were saved and often used in other areas to fill in the edges. As one final touch, I outlined the large Viking with a gold chisel-tip Paint Pen.
To hang the art, I drilled a couple holes through the side border, about 12 inches from the top. I fed wire through the holes and secured it by twisting the wires together. I used gold paint to disguise the wire that was visible on the front of the frame. To protect the art, I applied 3 layers of glossy Mod Podge by brush and one final layer of glossy spray Mod Podge. The spray reduces the tacky feel of the sealant.
The final project is displayed at the end of a long hallway. As you are walking from a distance, you notice the large Viking. As you get closer, you notice the smaller Vikings. The students loved searching for their individual Vikings in the finished piece, which we titled "We Are Vikings". Thank you, Mr. Nicolas, for allowing us to use your Viking tessellation.
If you would like to attempt a collaborative art project, I would be happy to answer any questions you may have. The projects have definitely brightened our building. When former students visit, they are proud to point out their art work and are happy to see it still hanging. It is a great tradition that we have started. The biggest problem is coming up with new ideas each year!
Thank you for allowing me to share my alter ego as Mrs. Dennis, the art teacher!
I am very fortune to have several sets of hand drums. They come in sets with 5 different sizes that nest together. As I have acquired more drums, I realized I needed an easy system to group the drums back in their families.
I have one set of hand drums from Periopole which are color coded by size. I liked this system and thought for one moment what it would take to paint the drums. But, I opted for color-coded labels. Each size is assigned a color and number.
8" drum = #1 Purple
10" drum = #2 Blue
12" drum = #3 Green
14" drum = #4 Yellow
16" drum = #5 Red
Each family was assigned a letter which precedes the number. So, a drum labeled D3 would be a 12" drum with a green label and nest with the other D drums.
The labels are printed on standard mailing labels measuring 1" by 2 5/8". I borrowed some clear book tape from my librarian to add an extra layer of protection from peeling.
I'm very happy with this project and the kids were excited to see the fancy labels. No one has dared try to peel the tape off yet! They saw my face and knew I was serious about losing their drum if I saw them destroying my new labels! If you would like to use these labels in your classroom, I have the file uploaded to my Teachers Pay Teachers store. The link is below. Happy drumming!
My school started back last week. SUMMER IS OVER!!! Boo boo. I didn't change my music room set-up much, but I would like to unveil my new double-decker gong stand! I have a small gong and a large Thundersheet (purchased many years before I was here when textbook funds still existed and could be used for musical instruments). When I found them, they had no stands. The gong didn't even have a string. I added a shoestring to the gong and used an old chart rack to hang them. I would swap them out when I needed them, but that was a pain. I ended up leaving the Thundersheet on the chart rack and holding the gong by hand. The chart rack was also very wobbly. I attempted to stabilize the rings by slicing sections of garden hose to wrap around the top bar. This helped prevent the instruments from sliding left or right and falling to the ground. But, I still had to hold the rack or step on it to make sure it didn't fall over after a forceful hit. With this set-up, they weren't used very often.
Last spring, a teacher was trashing some pieces of PVC and I rescued them from the garbage before they were taken to the dumpster. I believe the pieces were left by a previous teacher and used as a backdrop for a photo booth. I only had to purchase 2 more T connector joints for less than $3 to create this new double decker stand to hang both the gong and Thundersheet. Now that they are readily accessible, I'm certain I will find more ways to utilize them in lessons.
The pipes were 1 inch diameter (Measuring the opening of the pipe). I'm not sure how much this project would cost if you were to purchase all the materials yourself, but I'm certain it is much cheaper than any gong stand currently on the market. If you are not inclined to attempt this yourself, I'm sure you could ask for a parent volunteer to offer their skills. If you have any more questions about this project, I'd be happy to answer them!
Happy Music In Our Schools Month! I am teaming up, once again, with some fellow music ed bloggers for "31 Days of Rhythm". My first post on March 17th was about Rhythmic Popcorn. Today, I will be sharing ideas for teaching rhythm with game centers.
I began using centers about 3 years ago. Centers provide an opportunity for the class to be engaged in activities while I work with small groups. I use centers every time I have recorder playing tests or when I want to hear individuals sight read short rhythms or melodies on flash cards. I have also used centers to isolate a small group on ukulele and provide more feedback to individuals correcting hand positions and strumming technique. Centers are also great as emergency sub plans! Most substitute teachers have no background knowledge in music. Centers allow my students to reinforce music skills while I'm not there.
I have many posts about centers, but today I will briefly describe a few that make connections to rhythm.
#1) Over the Edge
"Over the Edge" is a game to reinforce rhythmic durations. It is a free printable from pianamation.com. Students each have a game board with a waterfall. They draw cards and place bingo chips or glass pebbles on their river to equal the number of beats of the note or rest. The object of the game is to be the last person who has not filled their card and fallen off the waterfall. My full post on Over the Edge can be found at this link.
#2) Rhythm Rockets
Rhythm Rockets are part of Artie Almeida's Music Proficiency Packs. This game tests students' ability to read and perform rhythms and their ability to recognize them aurally. Each student gets a rocket with identical rhythms. The official instructions may be different, but I'll describe what works best with my students. I have a small group sitting in a straight line. One student stands in front of them and chooses a rhythm from the rocket to perform for the group. They can either count it out loud using rhythmic syllables or perform it with body percussion. The students identify which rhythm the individual was performing by placing a clothes pin on the side of their rocket. Then, they must put their rocket on top of their head. This will allow the individual performing the rhythm to easily recognize who got the correct answer first. The winner will get to perform a rhythm for the group next. My full post describing Rhythm Rockets can be found here.
#3) Sneaky Snake
Sneaky Snake is another Music Proficiency Pack by Artie Almeida. This game requires students to recognize notation symbols such as notes, rests, clefs, bar lines, etc. I have found this game works best in pairs. The symbols appear on one side of the paper while the written name appears on the back. There are holes in the cardstock beside each symbol. Partners sit facing each other holding the snake page between them. One partner calls out a symbol and the other partner must identify it by sticking a straw in the corresponding hole. My full post describing Sneaky Snakes can be found here.
#4 Beat Strips
Beat Strips are another Music Proficiency Pack from Artie Almeida. They provide opportunities for students to compose 4 beat patterns using quarter notes, eighth note pairs, and quarter rests. This can be done to freely compose and perform for a partner. This could also be a dictation game. One individual could perform a rhythm from a list you provide and the group would have to notate it on their beat strips. My full post describing Beat Strips can be found here.
#5) Connect 4
Recycle that old board game and turn it into a music center! The classic version of Connect 4 is a fun game to compose with simple quarter notes and quarter rests. The red checkers could represent notes while the black checkers represent rests. This would be great for kindergarteners. To challenge older students, I found this Connect 4x4 game at a yard sale. It features 4 colors of checkers which could represent different instruments. In the picture below you can see construction paper squares that helped the kids remember which color they should play. It also has checkers with holes in the middle which could represent rests. The full post describing Connect 4 can be found at this link.
Thank you for visiting my blog for 31 Days of Rhythm. If you would like to read more posts from this event, you may visit Facebook and follow the MusicEd Blogs page.
Happy Music In Our Schools Month! For this month, I am teaming up with some fellow music ed bloggers for "31 Days of Rhythm". I decided to share a post about rhythmic popcorn.
Brian Burnett is an amazing music educator. I was fortunate to have him as a movement instructor during all three levels of Orff training at the University of Kentucky. Last year, he also presented at our state convention. During his presentation on assessment, he stressed the importance of "branding" in the classroom. He explained that finding a gimmick and being consistent would improve student performance. This concept could be as simple as using a similar formatting for all your worksheets or Powerpoint slides. When students are presented information that is always organized in a similar way, they can easily digest the information visually and know what is expected with the activity. Brian also uses lots sound effects and vocal inflection similar to a car salesman. His dramatic expression grabs your attention. Key concepts and terminology are "branded" with short jingles or slogans. If they are presented consistently in this manner, the sound of the jingle will spark the memory of the student.
Over the past year, I have reflected on this advice and tried to incorporate some purposeful branding in my classroom. I often use analogies to help young students grasp an abstract concept. I soon realized that analogies are a perfect jumpstart to branding, I made some simple adjustments to the delivery of my message, making it more consistent and more dramatic. Problem: Students are not performing rhythmically in unison. Solution: Remind students to get rid of the popcorn.
Popcorn is delicious, but it makes a terrible steady beat! I have students visualize popcorn popping. I use descriptive language to trigger powerful senses such as taste, smell, touch, and sound. When popcorn pops, the kernels do not pop at the same time. I make a comparison to their musical performance and exaggerate a musical example where multiple people are playing before, on, and after the beat. It sounds like musical popcorn. I ask the students to get rid of the popcorn and demonstrate by becoming a rhythm robot that plays exactly on the beat. After hearing and seeing this animated analogy, the students' performance is usually flawless.
A key component of branding is that something is easily recognizable. The first time I explain the concept of rhythmic popcorn, I take my time, I use expressive language, and I make lots of individual eye contact to ensure the students are really "buying into" my product/concept. The next time I encounter this issue, the students do not need such a long explanation. Eventually, saying the single word "popcorn" should be enough to remind students to play on the beat.
I have presented this analogy of popcorn to all grade levels, kindergarten through fifth, and we always had a drastic improvement in our rhythmic accuracy. Just last week, a first grade class was reading ta and tadi rhythms on the board and I stopped them abruptly. I was about to remind them about popcorn when a girl in the front row spoke out and said "I heard popcorn!" SUCCESS! The branding works and it has created more active listeners!
Thank you for visiting my blog for 31 Days of Rhythm. If you would like to read more posts from this event, you may visit Facebook and follow the MusicEd Blogs page.
In December, we were very fortunate to be selected to receive 40 new Waterman ukuleles from Kala Music! The giveaway was announced on Kala's Facebook page. We were one of 125 schools across the country to receive this generous donation.
The shipment arrived just in time to surprise the students at our Christmas concert. I placed the ukuleles in their boxes on an old TV cart with a few unopened on the top level. I wrapped the cart with bulletin board paper to make it look like a present.
During the concert, the present was revealed and the entire school was screaming with excitement! I began learning ukulele last February after a student teacher introduced it to me. I've fallen in love with the instrument and play it often for the kids. They knew immediately what was in those boxes. On the video, you can hear one student screaming ,"Ukuleles! Ukuleles! Ukuleles!".
Storage
My first task was to find storage so I could access them quickly for distribution and tuning. Keeping them in their cardboard boxes was not going to be convenient. My librarian had an extra cabinet in her closet with a broken door. She offered it to me and, with help of the custodian, we repaired the door.
The ukuleles were too long to lay horizontal in the cabinet, so I experimented with tension rods to support the ukuleles at an angle. Due to the plastic walls of the cabinet, the tension rods would slip and fall from the weight of just a few ukes.
I searched Pinterest and google for ukulele storage ideas but didn't have funds to invest in wood and materials. Instead, I decided to utilize the cardboard boxes the ukuleles were shipped in.
I cut each box in half and then made one side shorter (about 5" tall).
There are 4 shelves in my cabinet so I planned to have 10 ukuleles on each shelf. I measured and divided to determine the spacing needed and cut notches in the back for the neck to rest.
I cut some tabs in the front which fold down and keep the ukuleles from bumping into each other.
Here is a final pic with all the ukuleles nestled into their new home!
Tuning
Now that I can access the ukuleles easily, I have began the long process of tuning. It is taking quite a long time to get the strings stretched to hold their pitch. The students keep begging to play them, but I told them to be patient. If they sound bad, I want it to be the students' fault and not the instruments' fault.
Since tuning is taking such a long time by myself, I have started a Donors Choose project requesting funding for some clip-on tuners. The project is titled, "Tune Our Ukuleles". Hopefully our project will get funded soon so we can begin making some beautiful music with these new instruments!
Stay tuned!
I'm sure I will post more about the ukuleles in the future!