The challenges of distance learning have led me down a deep rabbit hole to learn how to code. I have been using Scratch to create interactive music experiences for my students learning at home. If you missed my other posts on Scratch, click this link.
I have created a Facebook Group called Scratch For Music Educators. The group is growing rapidly. Many members are new and are unsure of how to get started with Scratch. So, I am creating some Scratch tutorials aimed for the music educator. You can watch and decide if Scratch can be used to enhance your curriculum.
This tutorial will be expanded as I discover new tricks. Updates will always be announced in the Scratch for Music Educators Facebook group and posted here on this blog. If you have a suggestion for a tutorial, complete the Google Form on the last slide.
The challenges of distance learning have led me down a deep rabbit hole to learn how to code. I have been using Scratch to create interactive music experiences for my students learning at home. If you missed my other posts on Scratch, click this link.
I use fairy tales to help introduce the kindergarten students to the Orff instruments for the first time. I "The Three Billy Goats Gruff" we compare the sizes of the billy goats and the sizes of the bars. The bigger bars sound lower and the smaller bars sound higher. We also change our voices to sound higher and lower. In this Scratch game, the students click the goats and troll for sound effects.
In Goldilocks, we continued to explore size and pitch and compared the different size xylophones. Papa Bear becomes the bass, Mama Bear becomes the alto, and Baby Bear becomes the soprano. Goldilocks is the glockenspiel. In class, we get to take turns rotating through these instruments while I read the story. With the Scratch game, they get to play all the sounds. They can click the character or click the instrument.
The challenges of distance learning have led me down a deep rabbit hole to learn how to code. I have been using Scratch to create interactive music experiences for my students learning at home. If you missed my other posts on Scratch, click this link.
These games focus on triplets. "Loose Tooth" is a poem I learned at an Orff workshop using a body percussion ostinato. We would transfer the body percussion to unpitched percussion. This game allows students to change the rhythm of the ostinato. You can click each beat to change it from quarter note, triplet, or quarter rest. The instruments below can performed by clicking but it is easiest to use the number keys. I have embedded audio of the Loose Tooth poem so they can accompany with their ostinato.
After teaching "Loose Tooth" during student teaching, my mentor purchased this book as a gift-"A Tooth Story" by Margaret McNamara. I inserted a melodic phrase which also used the triplet rhythms. This Scratch allows the students to perform the melody of that phrase while listening to the audio of the story.
"Carnival Time" is a poem and song I composed. I brainstormed carnival words which would fit the quarter note and triplet rhythms. In a normal lesson, students would divide in groups and be given manipulatives to compose a phrase using the carnival words. They would get to choose instruments to perform for the class. In the Scratch game, the students click each beat to compose a phrase. The beats cycle through all the carnival words as well as a quarter rest. They can use the number keys to choose from several percussion sounds. If they click play, "Carnival Time" will begin in ABA form with the B section featuring the student's composition.
The challenges of distance learning have led me down a deep rabbit hole to learn how to code. I have been using Scratch to create interactive music experiences for my students learning at home. If you missed my other posts on Scratch, click this link.
The projects I'm sharing in this post focus on melody. In Tideo, the students will play the Tideo phrase at the ends of each line. In the video lessons, we examined the staff notation and used hand signs to sing in solfege. In a normal lesson, we would transfer this melody to the Orff instruments. In the Scratch, the song will play and a yellow box will appear around the notation for each phrase. Students use their number keys to play the melody.
I would normally use "Home" by Phillip Phillips with recorders. We would play the chorus on recorders and play the refrain on the xylophones. On Scratch, students will use their number keys to play both on a virtual xylophone. A yellow box will appear around each melody to show the students when to play.
"The Ballad of the Beetles and the Bedbugs" allows students to play a melodic ostinato to accompany the song-a broken bordun. Then, they have a chance to improvise a melodic section. This is one of the first lessons introducing melodic improvisation. I love using the baseball analogy. I compare Do to homebase and ask the students to end their melody on Do.
The challenges of distance learning have led me down a deep rabbit hole to learn how to code. I have been using Scratch to create interactive music experiences where students can play virtual instruments. If you missed my first post on Scratch, click this link.
My latest projects involve books-There Was a Cold Lady Who Swallowed Some Snow (Lucille Colandro) and The Mitten (Jan Brett). Both these stories are additive, starting with one character/item and adding on more and more as the story progresses. Additive stories are great to turn into sound stories adding musical sounds to represent the characters/items. This helps students focus on listening to the music and learning how to keep their instrument quiet when it is not their turn.
While teaching virtually, these lessons would be impossible without the help of virtual instruments. I used Scratch to code the games. I recorded myself reading and singing the story. This will begin when they click the play button. When they click the pictures of the items/animals, the image will change to an instrument and play that instrument sound. The images of the animals for The Mitten were taken from the free mask printables provided by the author Jan Brett.
I hope you and your students can enjoy these Scratch games. Again, you do not need a login to access Scratch. It is completely free. Simply share the link and they will have access to the game.
Coding. Did I ever think I would be teaching myself how to code? Nope. But, here I am jumping down the rabbit hole. Who knew it would be something that would expand my skills as a music educator?
I elected to be a cloud teacher for the district through December. I am the sole elementary music educator for 1400 cloud students. So, all of my teaching must be delivered asynchronously. With this large amount of students, creating instrument kits was out of the question. So, I started searching the web for interactive music instruments to include in my virtual classroom. That is when I discovered Scratch.
Scratch is a website where anyone can program interactive games, stories, and animations. This is completely free and you do not have to log on to access the games. I first found interactive instruments that were created by others. I featured them in my Virtual Classroom. You may click the image below to visit and take a peek.
I started including these instruments in lessons. I provided a link for the students to go to the virtual xylophone and try to play a song using their number keys. That seemed to be successful, but I wanted the students to be able to see the notation of the song and also play along to a track. So, I learned how to remix a Scratch project.
Scratch is also an interactive community where you can view projects created by others and also remix them. Remixing is a process of using someone else's project as a starting point and altering things to make a new project. For my first remix, I used a xylophone created by another user and added a new background and playing track. I have embedded it below. Click the space bar to begin the audio track. You can use the numbers or the letters to play the pitches, but it is easiest to use the numbers since they are in chromatic order. Our kindergarten through 2nd grade have touch screen Chromebooks. They would be able to touch the bars to play. The touch aspect would also work well on tablets or iPads.
After I got a taste of remixing, I had to learn more. My next projects used a guitar and strumming chord patterns. I used "Monster Mash" to get students in the mood for Halloween. For those students who do not celebrate, I offered an alternative-"Don't Worry Be Happy". I learned how to animate using motion. The bat and bird fly over the correct chords. The characters also have speech bubbles which tell the strumming patterns and the upcoming chord. Both projects are embedded below. Click the green flags to begin. You can use your letter keys to strum the chords or you could click the letters with your mouse or touch screen.
For the next project, I decided to combine the two options to play harmony and melody. I used the song "Skin and Bones". Students can play the Dm chord by clicking the guitar or using their space bar. The glockenspiel can be used to play the "Oo-Oo-Oo-Ooo" phrase. They can click the bars or use the number keys. Click the green flag to begin the audio track.
I'm sure I'm not done creating Scratch projects. I'll try to keep you updated. If you click the link below, you can view all the projects I have created in Scratch.
I would like to share how I use Google Forms for my students to submit photos and videos of their work. It has been a wonderful feature to manage responses and media from such a large amount of students.
I have two videos below. The first video shows you how to create your Google Form. The second video shows how to view and organized the responses. If you have any questions, comment below and I'll try to provide guidance.
This year, I started creating recorder play-along videos so my students could practice more efficiently at home. They have also been great for centers when I am assessing. Students who need some extra practice time or review can use these videos to practice before coming to me to play for their string test.
In each video, I sing the lyrics, sing the letters while fingering, and then actually play the recorder.
Here is one example video. You can view all these videos here on my classroom webpage.
With most of us forced to teach remotely due to spread of COVID-19, I thought it would a great time to share these videos, as well as a tutorial, in case you would like to use them or create your own.
Recorder Play-Along Video Tutorial
For this tutorial, I use Powerpoint on a Windows laptop and an iPhone/iPad with iMovie.
You can use a macbook or Droid Phone, but the steps may need to be modified slightly.
Part 1: Create Your Backgrounds
1) Use Powerpoint to create a solid black background.
2) Use the Snipping Tool to get screenshots of your music and fingering chart.
3) Save a black space on the side for the video to be inserted later.
4) Save the Powerpoint as jpg so each slide is an individual image.
5) Save those images in Google Drive so they can be opened on an Apple Device phone or ipad and save them to the camera roll.
View this video for a more detailed tutorial.
Part 2: Creating Your Movie
1) Record your video (I use my iPhone).
2) Resize the video to have a square frame. Do this by clicking edit, crop, then the square frame.
3) Open Google Drive to retrieve your backgrounds and save them to your camera roll. Select the file, then select the 3 dots, click "Send a copy", and click "Save image". It should now be on your camera roll.
4) Open iMovie and insert your background.
5) Disable Ken Burns Effect on the image.
6) Reposition the background using pinch, zoom, or one finger move.
7) Click the plus sign in the upper right corner, click on your video, click the 3 dots, and select "Picture In Picture"
8) Click your video in the bottom window to select it. Then click in the top box to reposition your video. You may also pinch to zoom if needed.
9) Click your video in the bottom window and unmute the audio.
10) Click your background image in the bottom window and stretch your image to play the entire length of your video.
11) Save video to camera roll and share your video on your desired platform (Youtube, email, webpage, Facebook, etc.)
I love to use the Acapella app to help create Orff arrangements. You can record videos and hear multiple parts simultaneously. There is a free version and paid version available in the Apple Store and Google Play.
With the free version of the app, you can record up to one minute in length. Since most of the Orff arrangements use repeated ostinatos, I have never needed a video longer than one minute. The paid upgrade offers longer videos and more options for formatting the video windows.
I have used the Acapella app to create videos to share Orff arrangements with other teachers. I have also posted videos on my classroom webpage for students to watch and practice at home. A few examples can be found below.
I have recently explored the social features of the app and would love to collaborate with other music teachers. If you download the app, you can click the “Discover” tab at the bottom of the screen and search for song titles, artists, tags, or people. I have added the tag #orff or #recorder to my videos.. If you would like to follow me, search for “mrsdennis” under people. If you follow me, I will follow you back. I look forward to building a community of music educators sharing Orff arrangements with each other!
It's time for a tech tip! Watch the video below to see how I view multiple windows at the same time. I use this most often during lesson planning to copy and paste between two documents. I've most recently used this feature during classroom instruction to display a YouTube video along with a Flipchart or Powerpoint slides. Watch below for more details!
Tech Tip: View Multiple Windows
Tech Tip: Increase productivity by viewing multiple windows at the same time. I use this feature during lesson planning and during classroom instruction.
Posted by Music With Mrs. Dennis on Tuesday, February 6, 2018
I have previous posts on how I use centers in my music room. You may click this link to read those posts.
I recently planned a lesson for 4th and 5th grade classes to review the pitches of the treble clef staff using centers. My class periods are 50 minutes. So, we planned for 10 minutes or so to explain the centers and then each group would have about 10 minutes to rotate at each of the four centers.
Giant Staff Twister
In one center, students played Twister using the giant floor staff. I used gym tape to create the staff lines on my floor and used the existing 12 inch tiles to keep my lines perfectly parallel. I have one spinner with the letters of the lines of spaces and one spinner to determine which body part should touch the correct line or space. The spinners are available on my teacher pay teacher store. I introduced Giant Staff Twister last year and it has become a favorite for the students.
Treble Toss
Many people who have blogged about the giant floor staff have had students try to toss bean bags on a specific line or space. Here in Kentucky, cornhole has become a very popular backyard game and I knew my students would love the challenge of tossing a bean bag through a hole. So, I used 2 trifold display boards (like you would use to display science fair projects) and created a staff with holes on the lines and spaces. Students would draw a popsicle stick to randomly select a pitch letter. Then, they had 3 chances to toss their beanbag into the correct hole. After their turn tossing beanbags at the spaces board, they would get in the back of the line for the lines board.
This game was a hit! To set up the boards, I borrowed a couple spare student desks from our furniture storage room. One flap rested on the top of the desk and I set a heavy object (a chromatic glockenspiel) on top of the cardboard. You could use a few heavy books or whatever items you want. The bottom flap would rest against the legs of the desk and caused the board to be slightly tilted which helped stabilize the board when the beanbags were tossed. The boards fold flat and lay horizontal in my cabinets, so it will be easy to pull these out and use them again in the future.
Staff Wars
The third center involved the Activboard. I downloaded Staff Wars from The Music Interactive. This is a free download for your pc. They have a new app version which is only 99 cents. The object of the game is to click the correct letter name of each note as it scrolls across the staff. The game gradually gets faster and more difficult. You can select the clef of your choice and also adjust the range of the notes it will give the students. The students LOVED this game! There are also several other free music games available on themusicinteractive.com. I look forward to downloading some more and trying them out.
Exit Slip and Flashcards
The fourth center involved an exit slip assessment which would be graded. The exit slip had students identifying letter names of some notes on the staff. The students were also asked to practice drawing a treble clef. The exit slips can be downloaded on my teachers-pay-teachers store.
As the students finished, they got to quiz each other with flash cards until it was time for the next rotation. The flash cards were a free download from Making Music Fun! The cards are one sided, so I added the letter names on the back so the kids could quiz each other. I printed these on cardstock so they would be more durable.
I know your students will enjoy these games as much as mine did! Enjoy!
I suppose I should've shared this information at the beginning of summer. I apologize. But, if you have an interactive white board, like a SMART board or ActivBoard, you may worry that it would get damaged over the summer with cleaning crews, painters, and other strangers working in the schools during break.
I protect my board during the summer with a full-size waterproof mattress cover. It eases my mind that someone cannot accidentally write on it with a marker. It is protected from paint and/or wax splatter. It is somewhat protected if there was a roof leak or if the sprinklers malfunction. The best part is that I bought it at Big Lots for only $5! Buy one new and stick it in a drawer so you have it ready for next summer!
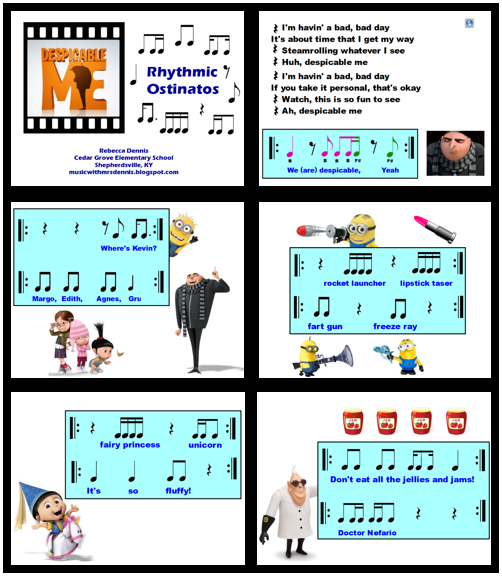
My student teacher and I recently designed two lessons inspired by the Despicable Me movies. Both flipcharts are available for free download on Promethean Planet.
The first lesson focused on rhythmic ostinatos and complementary rhythms. It also finished a unit which had introduced sixteenth notes to fifth graders. We had a few students playing an ostinato on Bass Boomwhackers to accompany the chorus of "Despicable Me" (the title theme for the first movie). The rest of the class was assigned rhythmic ostinatos performed in pairs as complementary rhythms. You could add instrument sound effects for the rhythms, but we added body percussion. Unfortunately, I did not think to take a video of this lesson. But, the flipchart is now uploaded to Promethean Planet and is available for free download! The slides of the flipchart can be seen in the collage below.
The next lesson reviewed harmony and introduced chord building. Students learned how to build chords by alternating letters and stacking alternating pitches on the staff. We used Boomwhackers to play chords along with Pharrell's "Happy" from Despicable Me 2 (Oscar Nominee 2014!) The students also learned about call and response and chorus/verse structure. The flipchart is available for free download on Promethean Planet. Images from the flipchart can be seen in the collage below.
I also have a video of a class performing Boomwhackers for this lesson. It is far from perfect and my dancing is pretty embarrassing, but I will share it anyway! Please, don't judge! lol
I hope your students enjoy these lessons as much as mine did!
I love being a student teacher mentor because it keeps my curriculum fresh. As my student teachers explore books and materials from my shelf, they discover songs and poems that I have overlooked for years! Last fall, I had my first student teacher for just 8 weeks. Ms. Morrison discovered the Mexican song "Don Gato" in an old textbook. (Grade 3, Music Connection from Silver Burdett & Ginn) The book suggested students play the chord roots on Orff instruments along with the recording. However, the chord progression was very challenging for many of the students in the short amount of time provided in the lesson. Also, the instruments were so loud it was very difficult for the students to hear the recording and stay with the tempo of the song. Although the lesson didn't go as well as planned, it was a great teachable moment and allowed for Ms. Morrison to practice self-reflection.
This fall, I had the pleasure of mentoring a second student teacher for an entire semester! Ms. Moreman and I cotaught "Don Gato" with some modifications. The original goal of the lesson was to teach about a ballad. The students would still learn about a ballad, but we decided the main focus of the lesson would be chord building. We had just studied the order of the musical alphabet with some relay races and small group games. (Click here to learn more about the staff games!) We wanted to reinforce this concept because some students were still struggling to remember that A follows G. We also decided to use Boomwhackers instead of barred instruments. The Boomwhackers were much more quiet and did not overpower the recording. The students LOVED this lesson!
Lesson Sequence
Discuss the term "ballad". Play one verse of "Don Gato" at a time, asking students what is happening in the story and how the plot has changed. I display the words of each verse on the flip chart as we discuss it.
Display the slide with "tempo" and "dynamics" definitions. Ask the students when they hear these musical elements change and how that was related to the story. (The music gets quieter and slower when Don Gato dies and louder and faster when he comes back to life.)
Review the definition of "harmony." Using a xylophone, demonstrate how to build a chord by skipping every other letter. Give the students a starting letter and ask them to spell the chord and build a triad (diatonic). Play each triad on the xylophone and ask them if it sounded major or minor.
Divide the class into 4 groups, one for each chord in the song (D minor, C major, G minor, and A major). Each student will play one or two Boomwhackers from their chord. Ask to play with a steady beat and then ask them only to play when you point to their chord grouping on the board.
Display the harmonic progression to accompany the song. Practice the progression in tempo without the music and then try to accompany the recording, remembering to change tempo and dynamics on the appropriate verse.
We also tried to sing the song without the recording so we could hear the Boomwhackers more clearly. I was able to conduct the groups and Ms. Moreman changed the slides to display the lyrics. (this could easily be a job for a student helper) The students' favorite part, by far, was singing "meow, meow, meow" in each verse.
Music Recording
I used the textbook CD to accompany the Grade 3 Music Connection by Silver Burdett & Ginn. If you don't have that textbook series, you can use the audio from this YouTube video.
How Many Boomwhackers Do You Need?
When I taught this lesson I used 5 sets of diatonic Boomwhackers and 6 Octavator caps. The small black rectangles represent the octavator caps which lower the pitch of the Boomwhacker a full octave. When teaching the lesson, I challenged the students to guess what the small black rectangles would represent. There was at least one student in each class who remembered the Octavator Caps from a previous lesson.
If you only have diatonic Boomwhackers, the A major and G minor chords will feature only the root and the fifth of the chord.
If you have 24 kids in a class, each group would have about 6 kids. So, you would need:
Group 1: DFA, 2 of each pitch
Group 2: CEG, 2 of each pitch
Group 3: GD, 3 of each pitch, 3 Octavator caps on G
Group 4: AE, 3 of each pitch, 3 Octavator caps on A
I have since purchased 2 sets of chromatic Boomwhackers. So, next year I plan on using this set up:
Group 1: DFA, 2 of each pitch
Group 2: CEG, 2 of each pitch
Group 3: GBbD, 2 of each pitch with 4 Octavator caps on G and Bb
Group 4: AC#E, 2 of each pitch, with 2 Octavator caps on A
For this set up, you would only need 4 diatonic sets, 2 chromatic sets, and 6 Octavator Caps.
I also purchased a set of bass diatonic Boomwhackers and plan rewarding one student in each group with the big Bass Boomwhackers. These sound best when you place an Octavator cap on them, hold them vertical, and tap the cap end on the carpeted floor.
***In the uploaded flipchart, both versions are available (with and without Bb and C#). You can choose which version to use according to your available resources.
I posted about the Rhythm Cat app in 2012. To read that post and learn more about the app, click here. I had downloaded the Lite version which was free. To unlock more levels, you had to purchase the Pro version for $4.99. Thanks to AppShopper, I have just been notified that Rhythm Cat Pro is currently marked down and is FREE to download! ENJOY!
A couple weeks ago, I blogged about two free apps to get young students composing--Tune Train and Music4Kids. Unfortunately, the Music4Kids app was only temporarily free and is now $2.99. I'm sorry if you missed out on the sale. To insure that you won't miss out on any future sales, may I recommend AppShopper?
AppShopper is free and available as an app on your device or online from their website. You can create a wish list of apps that you would like to purchase in the future. You will receive a notification if the price changes on the app. If you don't think you will log into the site or don't want to install the app on your device, you can also request to receive email notifications when any of your wish list apps go on sale.
Make sure you check out the App Activity to see the price history as well as update history. You can see how often it goes on sale and predict when it might go on sale again. Below you can see that the Dr. Seuss Band was on sale from February-April 2012. If it ever goes on sale again, it would likely be part of the Seuss birthday celebrations around March 2nd.
I have started my wish list of music apps that are not free in hopes that I can catch a sale in the future! Below you can see screenshots of my wish list. Are there any awesome apps I should add to my wishlist?
Dr. Seuss Band is only 99 cents. This is a great price for an app, but I haven't attempted spending school money on apps yet. The process described by our tech department sounded very complicated and I've avoided it, so far, by downloading free apps.
I have found two more free apps that allow young students to explore music composition.
Tune Train
The first app is called Tune Train. There are 10 musical worlds available to explore. Each world features a different musical style.
On each beat, you see people high and low. They essentially outline a chord. You use the train to draw a path and select people/notes you want in your melody. If you want to omit a note on that beat, you can make the train bypass that stop completely. This gives you options to alter the rhythm as well. Each student could create a truly unique song even if they selected the same musical world.
You can also view the actual music notation at the top of the screen.
The second app I have found is called Music4Kids.In this app, you see an actual treble clef staff. When you place a note on the staff, the pitch name also appears above it. Each note defaults as an eighth note. To make longer durations like quarter and half notes, you must hold your finger on the screen for a longer time.
There are 5 different musical planets available: birdy, hamster, octopus, fox, and ghost.
There is an option to save your composition to your "My Tunes" library. This may be a helpful tool for teachers. If students create a song during class, the teacher can go back through later to view what their work.
There is also a part of the game called "Challenges." This is a simple introduction to melodic dictation. Initially, the app will show you the music notes and play the melody. Then, you must notate the melody. If you need help, you may listen to the tune again, but it will not show the notation a second time.
Both apps are very kid-friendly and easy to navigate. The fact that they are free is also a wonderful bonus! I look forward to using these in the classroom.
I have recently been introduced to two websites that allow you to create quizzes using videos on YouTube or other websites. I have explored both sites and would like to share my observations to assist you in selecting a tool for your classroom.
I created an easy infographic above, but will give a more detailed explanation below.
Video Selection
If you want to combine clips from more than one video, Blubbr is the choice for you. You can only select one video for each quiz with eduCanon.
If you want to show more than 19 seconds of the video before inserting a question, eduCanon is the choice for you. But, with eduCanon, you have to show the video in its entirety. You cannot trim the video or skip to a specific time marking. With Blubbr, you can select any clip (up to 19 seconds) from any part of the video.
Creating Questions/Answers
Blubbr has a minimum of 5 questions and you MUST create a 4 option multiple choice question. EduCanon has no limitations or minimum requirements on questions. With eduCanon, you can create 2 or more multiple choice selections for each question.
EduCanon also allows for more customization offering different font choices, bold, italics, font color, font size. You can even insert pictures or charts into the question.
Below is a screenshot while editing in Blubbr:
Below is a screenshot while editing in eduCanon:
Scoring/Tracking
Blubbr times the questions and gives you 20 seconds to answer each question and you are rewarded more points for answering more quickly. You are shown a score at the end of the quiz, but individual scores are not reported to the quiz creator or teacher.
EduCanon gives the student unlimited time to answer the question. If the video is shared publicly, there is no score tracking. However, if students create usernames, the teacher can assign specific videos to students and get a report of their individual scores.
Viewing the Quiz
When each question appears on Blubbr, you cannot see the video anymore. You can see colored dots at the top of the screen tracking your progress in the quiz. They change green if you answer correctly and red if you answer incorrectly. The student has the option to skip the video clip and advance directly to the question if they wish. Below are two screenshots showing the video screen and then the question screen:
EduCanon questions appear to the left side of the video screen and you can still view the paused video. You can view the timeline on the bottom to show your progress in the quiz. Little question marks are used to show the student where the upcoming questions will appear. You are not allowed to skip ahead and advance the video. Below is a screenshot of the quiz:
Sharing
When you share a video publicly on eduCanon, a user will still need a URL link to view your quiz. Teachers can also assign videos to their students so they will automatically appear when they log in. At this time, EduCanon does not have a way to search for videos created by others.
If you post a video on Blubbr, it is automatically made public. There is no option to keep a video private. Blubbr has developed a great database to search for videos by title, keywords, or even category. When creating a video, you can pick up to 2 categories (Music and Education are available options) and you can also list many keywords. The education category is the largest and has more than 3000 trivs. Music is the second largest with over 1,300 trivs. Click here for a link to browse Blubbr categories.
Both sites allow you to share by URL or embed the quizzes into a website using html code.
Implementation
I decided to use Blubbr to create a video quiz for my Nutcracker unit. I really liked the freedom of eduCanon to insert questions wherever you would like, but I ended up choosing Blubbr because I could not show the full ballet and needed to be able to trim selections. Ideally, I would love a combination of these two sites which would allow me to use clips from multiple videos, but show video clips at least 30-45 seconds long. In the future, I will probably use both of these sites and evaluate the needs of each project before selecting the right tool.
Click below for links to my Nutcracker Blubbr Trivia!