It is spring! I've got some rainy day resources for your music lessons.
This video is a read aloud of "Listen To the Rain" by Bill Martin, Jr. and John Archambault. It is paired with Chopin's "Raindrop Prelude". It starts bright with gentle sprinkles. The middle section is more dark and gloomy as the storm brews. At the end, the sun returns with a rainbow and it is bright and happy again. The music and book pair so well together.
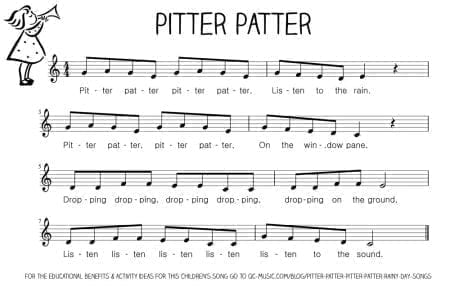
I used the song "Pitter Patter" from Let's Play Music. I actually turned this song into an ABA form to mimic the book. I asked the kids to create some motions for the A section and some different motions for the B section.
We created some rhythmic compositions to replace the B section of the Pitter Patter song. Since I am teaching digitally at the moment, I created a Scratch game to aid in their compositions. The students can click on the rhythms to cycle through 8 different rhythm choices. They can click the green button to hear the rhythms. They can click the purple button to hear the song in ABA form with the rhythms inserted as the B section.
I hope your students enjoy some of these rainy day music activities!
The challenges of distance learning have led me down a deep rabbit hole to learn how to code. I have been using Scratch to create interactive music experiences for my students learning at home. If you missed my other posts on Scratch, click this link.
I have created a Facebook Group called Scratch For Music Educators. The group is growing rapidly. Many members are new and are unsure of how to get started with Scratch. So, I am creating some Scratch tutorials aimed for the music educator. You can watch and decide if Scratch can be used to enhance your curriculum.
This tutorial will be expanded as I discover new tricks. Updates will always be announced in the Scratch for Music Educators Facebook group and posted here on this blog. If you have a suggestion for a tutorial, complete the Google Form on the last slide.
The challenges of distance learning have led me down a deep rabbit hole to learn how to code. I have been using Scratch to create interactive music experiences for my students learning at home. If you missed my other posts on Scratch, click this link.
I use fairy tales to help introduce the kindergarten students to the Orff instruments for the first time. I "The Three Billy Goats Gruff" we compare the sizes of the billy goats and the sizes of the bars. The bigger bars sound lower and the smaller bars sound higher. We also change our voices to sound higher and lower. In this Scratch game, the students click the goats and troll for sound effects.
In Goldilocks, we continued to explore size and pitch and compared the different size xylophones. Papa Bear becomes the bass, Mama Bear becomes the alto, and Baby Bear becomes the soprano. Goldilocks is the glockenspiel. In class, we get to take turns rotating through these instruments while I read the story. With the Scratch game, they get to play all the sounds. They can click the character or click the instrument.
The challenges of distance learning have led me down a deep rabbit hole to learn how to code. I have been using Scratch to create interactive music experiences for my students learning at home. If you missed my other posts on Scratch, click this link.
These games focus on triplets. "Loose Tooth" is a poem I learned at an Orff workshop using a body percussion ostinato. We would transfer the body percussion to unpitched percussion. This game allows students to change the rhythm of the ostinato. You can click each beat to change it from quarter note, triplet, or quarter rest. The instruments below can performed by clicking but it is easiest to use the number keys. I have embedded audio of the Loose Tooth poem so they can accompany with their ostinato.
After teaching "Loose Tooth" during student teaching, my mentor purchased this book as a gift-"A Tooth Story" by Margaret McNamara. I inserted a melodic phrase which also used the triplet rhythms. This Scratch allows the students to perform the melody of that phrase while listening to the audio of the story.
"Carnival Time" is a poem and song I composed. I brainstormed carnival words which would fit the quarter note and triplet rhythms. In a normal lesson, students would divide in groups and be given manipulatives to compose a phrase using the carnival words. They would get to choose instruments to perform for the class. In the Scratch game, the students click each beat to compose a phrase. The beats cycle through all the carnival words as well as a quarter rest. They can use the number keys to choose from several percussion sounds. If they click play, "Carnival Time" will begin in ABA form with the B section featuring the student's composition.
The challenges of distance learning have led me down a deep rabbit hole to learn how to code. I have been using Scratch to create interactive music experiences for my students learning at home. If you missed my other posts on Scratch, click this link.
The projects I'm sharing in this post focus on melody. In Tideo, the students will play the Tideo phrase at the ends of each line. In the video lessons, we examined the staff notation and used hand signs to sing in solfege. In a normal lesson, we would transfer this melody to the Orff instruments. In the Scratch, the song will play and a yellow box will appear around the notation for each phrase. Students use their number keys to play the melody.
I would normally use "Home" by Phillip Phillips with recorders. We would play the chorus on recorders and play the refrain on the xylophones. On Scratch, students will use their number keys to play both on a virtual xylophone. A yellow box will appear around each melody to show the students when to play.
"The Ballad of the Beetles and the Bedbugs" allows students to play a melodic ostinato to accompany the song-a broken bordun. Then, they have a chance to improvise a melodic section. This is one of the first lessons introducing melodic improvisation. I love using the baseball analogy. I compare Do to homebase and ask the students to end their melody on Do.
The challenges of distance learning have led me down a deep rabbit hole to learn how to code. I have been using Scratch to create interactive music experiences where students can play virtual instruments. If you missed my first post on Scratch, click this link.
My latest projects involve books-There Was a Cold Lady Who Swallowed Some Snow (Lucille Colandro) and The Mitten (Jan Brett). Both these stories are additive, starting with one character/item and adding on more and more as the story progresses. Additive stories are great to turn into sound stories adding musical sounds to represent the characters/items. This helps students focus on listening to the music and learning how to keep their instrument quiet when it is not their turn.
While teaching virtually, these lessons would be impossible without the help of virtual instruments. I used Scratch to code the games. I recorded myself reading and singing the story. This will begin when they click the play button. When they click the pictures of the items/animals, the image will change to an instrument and play that instrument sound. The images of the animals for The Mitten were taken from the free mask printables provided by the author Jan Brett.
I hope you and your students can enjoy these Scratch games. Again, you do not need a login to access Scratch. It is completely free. Simply share the link and they will have access to the game.
Coding. Did I ever think I would be teaching myself how to code? Nope. But, here I am jumping down the rabbit hole. Who knew it would be something that would expand my skills as a music educator?
I elected to be a cloud teacher for the district through December. I am the sole elementary music educator for 1400 cloud students. So, all of my teaching must be delivered asynchronously. With this large amount of students, creating instrument kits was out of the question. So, I started searching the web for interactive music instruments to include in my virtual classroom. That is when I discovered Scratch.
Scratch is a website where anyone can program interactive games, stories, and animations. This is completely free and you do not have to log on to access the games. I first found interactive instruments that were created by others. I featured them in my Virtual Classroom. You may click the image below to visit and take a peek.
I started including these instruments in lessons. I provided a link for the students to go to the virtual xylophone and try to play a song using their number keys. That seemed to be successful, but I wanted the students to be able to see the notation of the song and also play along to a track. So, I learned how to remix a Scratch project.
Scratch is also an interactive community where you can view projects created by others and also remix them. Remixing is a process of using someone else's project as a starting point and altering things to make a new project. For my first remix, I used a xylophone created by another user and added a new background and playing track. I have embedded it below. Click the space bar to begin the audio track. You can use the numbers or the letters to play the pitches, but it is easiest to use the numbers since they are in chromatic order. Our kindergarten through 2nd grade have touch screen Chromebooks. They would be able to touch the bars to play. The touch aspect would also work well on tablets or iPads.
After I got a taste of remixing, I had to learn more. My next projects used a guitar and strumming chord patterns. I used "Monster Mash" to get students in the mood for Halloween. For those students who do not celebrate, I offered an alternative-"Don't Worry Be Happy". I learned how to animate using motion. The bat and bird fly over the correct chords. The characters also have speech bubbles which tell the strumming patterns and the upcoming chord. Both projects are embedded below. Click the green flags to begin. You can use your letter keys to strum the chords or you could click the letters with your mouse or touch screen.
For the next project, I decided to combine the two options to play harmony and melody. I used the song "Skin and Bones". Students can play the Dm chord by clicking the guitar or using their space bar. The glockenspiel can be used to play the "Oo-Oo-Oo-Ooo" phrase. They can click the bars or use the number keys. Click the green flag to begin the audio track.
I'm sure I'm not done creating Scratch projects. I'll try to keep you updated. If you click the link below, you can view all the projects I have created in Scratch.
I would like to share how I use Google Forms for my students to submit photos and videos of their work. It has been a wonderful feature to manage responses and media from such a large amount of students.
I have two videos below. The first video shows you how to create your Google Form. The second video shows how to view and organized the responses. If you have any questions, comment below and I'll try to provide guidance.
Due to the Covid-19 pandemic, schools nationwide are forced to close and implement instruction from home. My district is calling this NTI (Nontraditional Instruction). The lessons I create must be accessible for all students, even those without access to technology. We are creating packets each week that get dropped off and collected by the bus drivers. I will be sharing all my lesson ideas for free for those of you who are in this same desperate situation.
This NTI lesson is titled "Family Music Interview". I wanted the students to connect with an older relative and compare/contrast their school music experiences. Students have the option to respond on a Google Form or with paper and pencil. Below are screenshots of the paper that was sent home.
I have this available for you as an editable download. Click the link below. It will open as a Google Slide. Make sure you edit the portion for digital submission. You could share a url link to the platform of your choice. You could include your email, but your inbox may fill up very quickly. If you choose, you can delete the digital portion all together. If you are curious about using Google Form for submission, I will be sharing a tutorial very soon. Check back by the end of the week.
This year, I started creating recorder play-along videos so my students could practice more efficiently at home. They have also been great for centers when I am assessing. Students who need some extra practice time or review can use these videos to practice before coming to me to play for their string test.
In each video, I sing the lyrics, sing the letters while fingering, and then actually play the recorder.
Here is one example video. You can view all these videos here on my classroom webpage.
With most of us forced to teach remotely due to spread of COVID-19, I thought it would a great time to share these videos, as well as a tutorial, in case you would like to use them or create your own.
Recorder Play-Along Video Tutorial
For this tutorial, I use Powerpoint on a Windows laptop and an iPhone/iPad with iMovie.
You can use a macbook or Droid Phone, but the steps may need to be modified slightly.
Part 1: Create Your Backgrounds
1) Use Powerpoint to create a solid black background.
2) Use the Snipping Tool to get screenshots of your music and fingering chart.
3) Save a black space on the side for the video to be inserted later.
4) Save the Powerpoint as jpg so each slide is an individual image.
5) Save those images in Google Drive so they can be opened on an Apple Device phone or ipad and save them to the camera roll.
View this video for a more detailed tutorial.
Part 2: Creating Your Movie
1) Record your video (I use my iPhone).
2) Resize the video to have a square frame. Do this by clicking edit, crop, then the square frame.
3) Open Google Drive to retrieve your backgrounds and save them to your camera roll. Select the file, then select the 3 dots, click "Send a copy", and click "Save image". It should now be on your camera roll.
4) Open iMovie and insert your background.
5) Disable Ken Burns Effect on the image.
6) Reposition the background using pinch, zoom, or one finger move.
7) Click the plus sign in the upper right corner, click on your video, click the 3 dots, and select "Picture In Picture"
8) Click your video in the bottom window to select it. Then click in the top box to reposition your video. You may also pinch to zoom if needed.
9) Click your video in the bottom window and unmute the audio.
10) Click your background image in the bottom window and stretch your image to play the entire length of your video.
11) Save video to camera roll and share your video on your desired platform (Youtube, email, webpage, Facebook, etc.)
My district is starting Nontraditional Instruction starting Monday due to the rapid spread of COVID-19. Teachers will be asked to report to school everyday, but students will remain home. I will be sharing any materials I create for assignments for free and will be available to answer any questions you also have.
Here is the basics of how this process will work. We surveyed families to find out who has internet access and devices at home. Families without internet or devices will be given paper assignments. Those papers will be shuttled by bus drivers, who will also be delivering breakfasts and lunches to families who qualified for free and reduced lunch. Teachers will report to work as usual. We will be working on new assignments and making daily contact with families offering assistance and checking in to see what work has been completed. Special area teachers will not have to contact every family. We will be assisting homeroom teachers that have the most students.
My special area team has agreed that each day, all grade levels will be given an assignment in only one special. It will be easier for families with multiple children of varying ages to work together on the same type of assignment.
Here is a sample of the first assignment I am sending home. I am sharing this via Google and it will force you to make a copy. You will be free to edit without to suit your needs without changing the original. I will share more assignments and information as this rolls out and we are learning more about this process.
Four years ago, I searched YouTube for tutorials on mallet wrapping. Here is my first post on that journey.
Below is a picture of mallets that I rewrapped four years, They are starting to fray.
I also have several pairs that were still factory-wrapped that are in rough shape.
I spent the weekend rewrapping over 17 pairs of mallets and I have made a tutorial video for you. I hope you will be brave and attempt to save some of your old tattered mallets. If you have any questions after watching the video, I'd be glad to answer them. Happy wrapping!
My second year teaching, I created an Orff visual aid with removable Velcro bars. More details about that instrument can be found on this post.
After 14 years of teaching, the foam board is severely worn. The F was ripped and replaced by folded paper and a paperclip. Many of the labels have multiple layers of scotch tape holding them on. I decided it was time for an upgrade.
If I was going to create a new Orff visual, I wanted it to last until my retirement. So, I decided to make it out of wood. I had some scraps of utility plywood from an art project. I measured and cut my pieces, sanded the edges, and painted with acrylic craft paint.
I have a friend with a Cricut which could custom cut vinyl for the letters. I created white letters for the bars and black letters for underneath the bars. I bought new velcro dots and then sprayed the bars and base with a Mod Podge clear coat.
Here is a picture with the extra sharps and flats.
The students were so excited to see the new "fake instrument". It is functional and aesthetically pleasing. I'm certain this will last for many years to come. I may even get to pass it along to a new teacher when it is finally time for me to retire.
I love to use the Acapella app to help create Orff arrangements. You can record videos and hear multiple parts simultaneously. There is a free version and paid version available in the Apple Store and Google Play.
With the free version of the app, you can record up to one minute in length. Since most of the Orff arrangements use repeated ostinatos, I have never needed a video longer than one minute. The paid upgrade offers longer videos and more options for formatting the video windows.
I have used the Acapella app to create videos to share Orff arrangements with other teachers. I have also posted videos on my classroom webpage for students to watch and practice at home. A few examples can be found below.
I have recently explored the social features of the app and would love to collaborate with other music teachers. If you download the app, you can click the “Discover” tab at the bottom of the screen and search for song titles, artists, tags, or people. I have added the tag #orff or #recorder to my videos.. If you would like to follow me, search for “mrsdennis” under people. If you follow me, I will follow you back. I look forward to building a community of music educators sharing Orff arrangements with each other!
September set records for the hottest and driest month in over 80 years. But, fall has finally arrived and we are experiencing a cool down. With changing temps comes layers, and children love to shed layers while we are moving and dancing in music class. But, they don't always remember to take their jackets and hoodies with them when they leave. Last year, I came up with a solution.
I call this the Stuff Bucket. Anything the students bring to class that they don't need with them during the lesson goes into this plastic bin. Before I had the Stuff Bucket, I would often find random clothing, hair bows, books, and eye glasses that students would place on any nearby surface. They would sneak them on shelves, tables, my desk, or even the marker tray at the board. Often I would not notice these things until the end of the day, or even the following day, and with many classes visiting my room, it was difficult to track down owners of the lost items.
My Stuff Bucket sits right by the door so we can make sure it is empty before each class leaves. I have seen a significant reduction in unclaimed items and I rarely have to take items to the school's Lost and Found. If you have a problem with abandoned jackets and lost items, you should create try creating your own Stuff Bucket. Let me know if it helps or if you have any other suggests to prevent the accumulation of lost items.
Three years ago, my student teacher sparked my interest in the ukulele and I began teaching myself how to play. During these years, I have fallen in love with this tiny instrument. Since then, I acquired a class set of ukuleles and began adjusting my curriculum. I even began teaching private lessons on the ukulele and now have a private studio which is growing steadily. Not only has the ukulele changed my teaching, it has also changed my life as a musician.
I have never been a confident singer, but last month I attended my first ukulele open mic night at a coffee shop. I've played for my students countless times with no problems, but I definitely felt nervous as I stepped on stage for an audience of strangers. It had been years since I had felt those performance jitters. It was a great experience to remind me of how my students may feel when I ask them to sing solo in class.
Last Friday, I went to the ukulele open mic for a second time. I felt more confident and my daughter even joined me on stage for one song. She was a little nervous but she is excited to go back next month and try a new song.
Three years ago, I would have never imagined that I would perform at an open mic. I am so grateful for this tiny instrument which has completely changed my life. The ukulele has reminded me of why I fell in love with music. It made me go through the process of learning again which has also made me a better teacher. Great teachers never stop learning. So, stretch beyond your comfort zone and become a beginner again. You're never too old to try something new.
Coda:
I hope to post more tips on teaching ukulele in the classroom and learning ukulele as an adult.
Click this link to see more Ukulele Posts.
Click this link if you would like to see videos of me performing on ukulele.
I am very fortunate to have a large collection of Orff instruments. I am also very fortunate to have a large space to allow most of the instruments to remain out at all times and still have open space for movement. Here is a glance of my Orff set-up. You can view a full tour of my room on this post.
I feel like I have a pretty good system for my instruments ... except for my accidentals. For years, I have kept the accidentals separated in Ziploc bags in a basket on the shelf. When we needed F# or Bb I would have to pass the bags out. Matching the correct bag to the correct instrument was very time consuming. I knew I needed a new system and kept trying to brainstorm solutions.
Last May, I started saving empty containers of disinfectant wipes. I removed the labels and then used zip ties to attach them to the instruments. I have a few instruments on rolling stands. These containers were attached to the legs of the stand and the weight rested on the bottom brace. I used 2 zip ties on the top and 2 zip ties on the bottom.
Most of my instruments sit flat on the floor. I first measured the height of the instrument so the container could sit right below the edge of the top piece of wood. I cut the container easily with a box cutter. The instrument pictured below is Sonor Primary line. There are threaded holes already in these instruments to attach legs which are purchased separately. I used these holes to feed the zip ties through. It took 3 zip ties to secure these containers through the holes.
The Sonor alto metallophones sit a little taller and didn't need as much trimming.
I have a couple older Sonor instruments that have pressed wood boxes. These instruments were taller and the containers did not need trimmed at all. They also had metal threads for legs, but there was not a hole going through the wood box. I used a drill to create a small hole through the wood inside the threaded hole.
I'm so pleased with this new system. I was afraid there may be rattling from the bars vibrating against each other, but we have been playing with them a few weeks and I haven't noticed any noises. My older students have done a great job switching the bars and returning the naturals back when they were finished. The students have also used the containers for extra mallet storage. Since I used zip ties, these containers can be easily removed and then replaced if needed.
The best thing about this system is that it was practically free! I bought some zip ties at a discount store for just $2. In May, I also asked the classroom teachers to send me their empty wipe containers. Since they were cleaning for summer, I quickly accumulated enough for my instruments.
How do you store your accidentals? Share below if you have a great idea that others may want to copy.
I hope to share ideas and tips on a more regular basis, so I am starting a series called Friday Reflections. Each Friday, I will reflect on my week and try to share a highlight which may be helpful to you. It may be a resource which I use that I would like to recommend. It may be my favorite moment from the week. It may be a revelation I had to improve my own practices. These posts will be shorter than my usual posts and I hope they may be beneficial to someone.
Today's reflection is highlighting a 1st grade lesson which I have taught for many years. I tried something new and it really improved our musicianship. This lesson uses the rhyme "One, Two, Buckle My Shoe" and is based on the lesson presented in the Mallet Madness books. All students use the Orff instruments and freely improvise with a given rhythm. There is a sequence which starts simple isolating the numbers or isolating the words. After a few turns clicking mallets, playing, and resting, we discuss the difference between wooden bars and metal bars. I assign the numbers to the metals and the woods to the words. They have to learn to rest when it is not their turn.
We eventually play the rhythms without our voices. The students must internalize the words in order to stay together. This particular group was playing a little sloppily. I asked that they try one more time, but with their eyes closed. They performed again and it was much more clean. By closing their eyes, they could not watch my conducting cues. They were forced to use their ears listen for the groups talking back and forth. They ended up hitting the bars more in unison instead of sounding like popcorn. When we opened our eyes everyone was smiling ear to ear. These tiny first graders could tell that we made something magical happen.
I've taught this lesson many years. I don't know why I decided to ask them to close their eyes, but I am so glad I did. It will definitely one of my top memorable moments. I have tried something similar during other lessons where I taught a portion non-verbally. By communicating with gestures only, the students were less distracted and listened more carefully to the sounds they were playing.
Have you ever decided to eliminate sight or speech during a lesson? I would love to hear your thoughts on isolating your senses.
A teacher's plight-getting things to stick to the cinder block walls. Most of the time, I can use masking tape hot glue, sticky tack, Stikki Clips, or any combination of those. However, I have 4 large posters which were laminated with the cold laminator. It made them very heavy and NOTHING seems to stick to that cold laminating film. Here is a picture of the posters from my classroom tour in 2012.
After years of trial and error, here is my solution. I hope it can help you too. They are in a new location now where they are stacked vertical. I first taped them together. I left some sticky tack on the back to help it stay straight, but the tack was not going to be bearing the weight of the posters.
I punched 2 holes in the top corners of the poster. I attached binder clips to the metal trim for the drop ceiling. I opened a paperclip to form an S hook to attach the poster to the binder hook.
These have been hanging with this method for several years and have never fallen down. I hope this could help someone with some stubborn posters. But, please check your fire code to make sure this would not violate any regulations. Do you have any tricks for hanging things? If you do, please share them below.